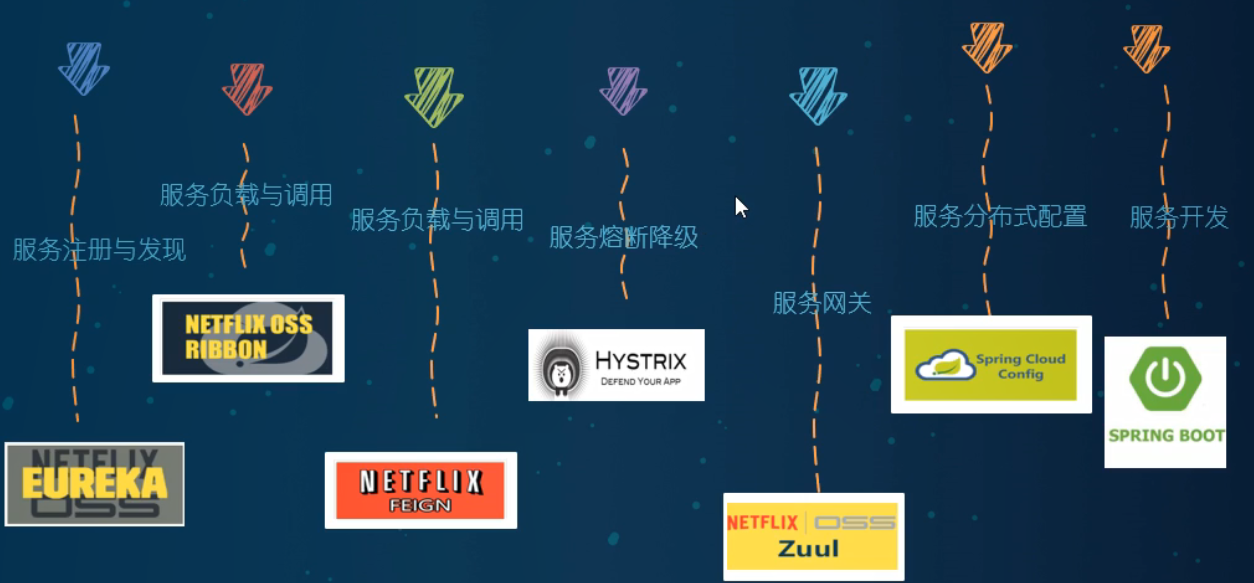
一、SpringCloud简介 SpringCloud 是微服务一站式服务解决方案,微服务全家桶。它是微服务开发的主流技术栈。它采用了名称,而非数字版本号。
springCloud 和 springCloud Alibaba 目前是最主流的微服务框架组合。
1.1 版本选择 springboot版本选择 1 2 git源码地址 https://github.com/spring-projects/spring-boot/releases/
强烈建议升级2.x
springcloud版本选择 1 2 3 4 5 git源码地址 https://github.com/spring-projects/spring-cloud https://spring.io/projects/spring-cloud 更详细的选择 https://start.spring.io/actuator/info
本次使用 1 2 3 4 5 6 7 cloud Hoxton.SR1 boot 2.2.2.RELEASE cloud alibaba 2.1.0.RELEASE java java8 Maven 3.5以上 Mysql 5.7及以上
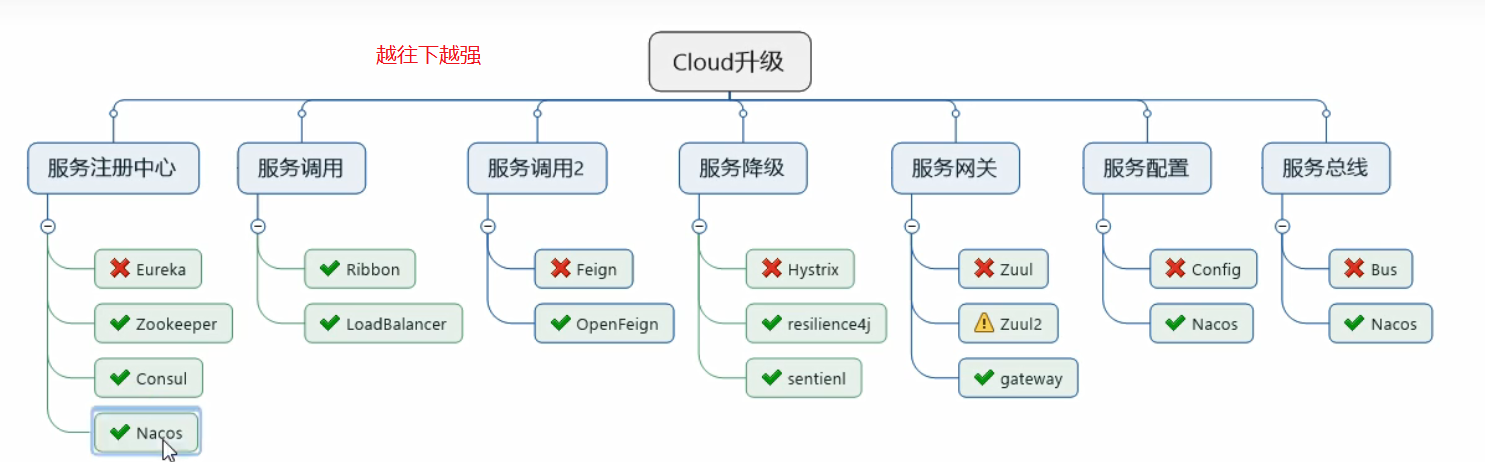
1.2 Cloud各种组件的停更/升级/替换 停更不停用
二、工程创建 2.1 创建父工程 1 2 3 4 5 6 7 1.new project 2.聚合总父工程名字 3.maven选版本 4.工程名字 5.字符编码utf-8 6.注解生效 7.java编译版本选8
2.2 父工程依赖 1 2 3 4 5 6 7 8 9 10 11 12 13 14 15 16 17 18 19 20 21 22 23 24 25 26 27 28 29 30 31 32 33 34 35 36 37 38 39 40 41 42 43 44 45 46 47 48 49 50 51 52 53 54 55 56 57 58 59 60 61 62 63 64 65 66 67 68 69 70 71 72 73 74 75 76 77 78 79 80 81 82 83 84 85 86 87 88 89 90 91 92 93 94 95 96 97 98 99 100 101 102 <?xml version="1.0" encoding="UTF-8"?> <project xmlns ="http://maven.apache.org/POM/4.0.0" xmlns:xsi ="http://www.w3.org/2001/XMLSchema-instance" xsi:schemaLocation ="http://maven.apache.org/POM/4.0.0 http://maven.apache.org/xsd/maven-4.0.0.xsd" > <modelVersion > 4.0.0</modelVersion > <groupId > com.lq.springcloud</groupId > <artifactId > cloud2021</artifactId > <version > 1.0-SNAPSHOT</version > <packaging > pom</packaging > <properties > <project.build.sourceEncoding > UTF-8</project.build.sourceEncoding > <maven.compiler.source > 1.8</maven.compiler.source > <maven.compiler.target > 1.8</maven.compiler.target > <junit.version > 4.12</junit.version > <lombok.version > 1.16.18</lombok.version > <log4j.version > 1.2.17</log4j.version > <mysql.version > 5.1.47</mysql.version > <druid.version > 1.1.16</druid.version > <mybatis.spring.boot.version > 2.1.1</mybatis.spring.boot.version > </properties > <dependencyManagement > <dependencies > <dependency > <groupId > org.apache.maven.plugins</groupId > <artifactId > maven-project-info-reports-plugin</artifactId > <version > 3.0.0</version > </dependency > <dependency > <groupId > org.springframework.boot</groupId > <artifactId > spring-boot-dependencies</artifactId > <version > 2.2.2.RELEASE</version > <type > pom</type > <scope > import</scope > </dependency > <dependency > <groupId > org.springframework.cloud</groupId > <artifactId > spring-cloud-dependencies</artifactId > <version > Hoxton.SR1</version > <type > pom</type > <scope > import</scope > </dependency > <dependency > <groupId > com.alibaba.cloud</groupId > <artifactId > spring-cloud-alibaba-dependencies</artifactId > <version > 2.1.0.RELEASE</version > <type > pom</type > <scope > import</scope > </dependency > <dependency > <groupId > mysql</groupId > <artifactId > mysql-connector-java</artifactId > <version > ${mysql.version}</version > <scope > runtime</scope > </dependency > <dependency > <groupId > com.alibaba</groupId > <artifactId > druid</artifactId > <version > ${druid.version}</version > </dependency > <dependency > <groupId > org.mybatis.spring.boot</groupId > <artifactId > mybatis-spring-boot-starter</artifactId > <version > ${mybatis.spring.boot.version}</version > </dependency > <dependency > <groupId > junit</groupId > <artifactId > junit</artifactId > <version > ${junit.version}</version > </dependency > <dependency > <groupId > log4j</groupId > <artifactId > log4j</artifactId > <version > ${log4j.version}</version > </dependency > </dependencies > </dependencyManagement > <build > <plugins > <plugin > <groupId > org.springframework.boot</groupId > <artifactId > spring-boot-maven-plugin</artifactId > <configuration > <fork > true</fork > <addResources > true</addResources > </configuration > </plugin > </plugins > </build >
上面配置的解释:
首先要加 pom 这个。
聚合版本依赖,dependencyManagement 只声明依赖,并不实现引入 ,所以子项目还需要写要引入的依赖。
如果不在子项目中声明依赖,是不会从父项目中继承下来的;只有在子项目中写了该依赖项,并且没有指定具体版本,才会从父项目中继承该项,并且version和scope都读取自父pom;
如果子项目中指定了版本号,那么会使用子项目中指定的jar版本。
dependencyManagement通常会在一个组织或者项目的最顶层的父POM中看到dependencyManagement元素。
这样做的好处就是:如果有多个子项目都引用同一样依赖,则可以避免在每个使用的子项目里都声明一个版本号,这样当想升级或切换到另一个版本
跳过单元测试 闪电
2.3 第一个微服务架构 1 2 3 4 5 6 微服务模块 1. 建模块 module 2. 改 pom 3. 写yml 4. 主启动 5. 业务类
建cloud-provider-payment8001 改pom 1 2 3 4 5 6 7 8 9 10 11 12 13 14 15 16 17 18 19 20 21 22 23 24 25 26 27 28 29 30 31 32 33 34 35 36 37 38 39 40 41 42 43 44 45 46 47 48 49 50 51 52 53 54 55 56 57 58 59 60 61 62 63 64 65 66 67 68 69 70 <?xml version="1.0" encoding="UTF-8"?> <project xmlns ="http://maven.apache.org/POM/4.0.0" xmlns:xsi ="http://www.w3.org/2001/XMLSchema-instance" xsi:schemaLocation ="http://maven.apache.org/POM/4.0.0 http://maven.apache.org/xsd/maven-4.0.0.xsd" > <parent > <artifactId > cloud2021</artifactId > <groupId > com.lq.springcloud</groupId > <version > 1.0-SNAPSHOT</version > </parent > <modelVersion > 4.0.0</modelVersion > <artifactId > cloud-provider-payment8001</artifactId > <dependencies > <dependency > <groupId > org.springframework.cloud</groupId > <artifactId > spring-cloud-starter-netflix-eureka-client</artifactId > </dependency > <dependency > <groupId > com.atguigu.springcloud</groupId > <artifactId > cloud-api-commons</artifactId > <version > ${project.version}</version > </dependency > <dependency > <groupId > org.springframework.boot</groupId > <artifactId > spring-boot-starter-web</artifactId > </dependency > <dependency > <groupId > org.springframework.boot</groupId > <artifactId > spring-boot-starter-actuator</artifactId > </dependency > <dependency > <groupId > org.mybatis.spring.boot</groupId > <artifactId > mybatis-spring-boot-starter</artifactId > </dependency > <dependency > <groupId > com.alibaba</groupId > <artifactId > druid-spring-boot-starter</artifactId > <version > 1.1.10</version > </dependency > <dependency > <groupId > mysql</groupId > <artifactId > mysql-connector-java</artifactId > </dependency > <dependency > <groupId > org.springframework.boot</groupId > <artifactId > spring-boot-starter-jdbc</artifactId > </dependency > <dependency > <groupId > org.springframework.boot</groupId > <artifactId > spring-boot-devtools</artifactId > <scope > runtime</scope > <optional > true</optional > </dependency > <dependency > <groupId > org.projectlombok</groupId > <artifactId > lombok</artifactId > <optional > true</optional > </dependency > <dependency > <groupId > org.springframework.boot</groupId > <artifactId > spring-boot-starter-test</artifactId > <scope > test</scope > </dependency > </dependencies > </project >
cloud-provider-payment8001 子工程的yml文件 1 2 3 4 5 6 7 8 9 10 11 12 13 14 15 server: port: 8001 spring: application: name: cloud-provider-payment8001 datasource: type: com.alibaba.druid.pool.DruidDataSource driver-class-name: com.mysql.jdbc.Driver url: jdbc:mysql://localhost:3306/cloud2021?useUnicode=true&characterEncoding=utf-8&useSSL=false username: root password: 123456 mybatis: mapper-locations: classpath:mapper/*.xml type-aliases-package: com.lq.springcloud.entities
主启动 1 2 3 4 5 6 @SpringBootApplication public class PaymentMain8001 public static void main (String[] args) SpringApplication.run(PaymentMain8001.class,args); } }
业务类 1.sql
1 2 3 4 5 CREATE TABLE `payment`( `id` bigint(20) NOT NULL AUTO_INCREMENT COMMENT 'ID', `serial` varchar(200) DEFAULT '', PRIMARY KEY (`id`) ) ENGING=InnoDB AUTO_INCREMENT=1 DEFAULT CHARSET=utf8
2.实体类
1 2 3 4 5 6 7 8 9 @Data @AllArgsConstructor @NoArgsConstructor public class Payment private Long id; private String serial; }
1 2 3 4 5 6 7 8 9 10 11 12 13 14 @Data @AllArgsConstructor @NoArgsConstructor public class CommonResult <T > private Integer code; private String message; private T data; public CommonResult (Integer code, String message) this (code, message, null ); } }
3.dao
1 2 3 4 5 6 7 @Mapper public interface PaymentDao int create (Payment payment) Payment getPaymentById (@Param("id") Long id) ; }
xml
1 2 3 4 5 6 7 8 9 10 11 12 13 14 15 16 17 <?xml version="1.0" encoding="UTF-8" ?> <!DOCTYPE mapper PUBLIC "-//mybatis.org//DTD Mapper 3.0//EN" "http://mybatis.org/dtd/mybatis-3-mapper.dtd" > <mapper namespace ="com.lq.springcloud.dao.PaymentDao" > <insert id ="create" parameterType ="Payment" useGeneratedKeys ="true" keyProperty ="id" > insert into payment(serial) values(#{serial}) </insert > <resultMap id ="BaseResultMap" type ="com.lq.springcloud.entities.Payment" > <id column ="id" property ="id" jdbcType ="BIGINT" /> <result column ="serial" property ="serial" jdbcType ="VARCHAR" /> </resultMap > <select id ="getPaymentById" parameterType ="Long" resultMap ="BaseResultMap" > select * from payment where id=#{id}; </select > </mapper >
4.service
1 2 3 4 5 6 public interface PaymentService public int create (Payment payment) public Payment getPaymentById (@Param("id") Long id) }
1 2 3 4 5 6 7 8 9 10 11 12 13 @Service public class PaymentServiceImpl implements PaymentService @Resource private PaymentDao paymentDao; public int create (Payment payment) return paymentDao.create(payment); } public Payment getPaymentById (Long id) return paymentDao.getPaymentById(id); } }
5.controller
1 2 3 4 5 6 7 8 9 10 11 12 13 14 15 16 17 18 19 20 21 22 23 24 25 26 27 28 @RestController @Slf4j public class PaymentController @Resource private PaymentService paymentService; @PostMapping(value = "/payment/create") public CommonResult create (Payment payment) int result = paymentService.create(payment); log.info("*****插入结果:" +result); if (result > 0 ){ return new CommonResult(200 ,"插入数据成功" ,result); }else { return new CommonResult(444 ,"插入数据失败" ,null ); } } @GetMapping(value = "/payment/get/{id}") public CommonResult getPaymentById (@PathVariable("id") Long id) Payment payment = paymentService.getPaymentById(id); log.info("*****插入结果:" +payment); if (payment != null ){ return new CommonResult(200 ,"查询成功" ,payment); }else { return new CommonResult(444 ,"没有对应记录,查询ID:" +id,null ); } } }
测试 使用postman进行测试
1.Adding devtools to your project
1 2 3 4 5 6 <dependency > <groupId > org.springframework.boot</groupId > <artifactId > spring-boot-devtools</artifactId > <scope > runtime</scope > <optional > true</optional > </dependency >
2.Adding plugin to your pom.xml
父类总工程
1 2 3 4 5 6 7 8 9 10 11 12 <build > <plugins > <plugin > <groupId > org.springframework.boot</groupId > <artifactId > spring-boot-maven-plugin</artifactId > <configuration > <fork > true</fork > <addResources > true</addResources > </configuration > </plugin > </plugins > </build >
3.Enabling automatic build
settings->build->complier ADBC打勾
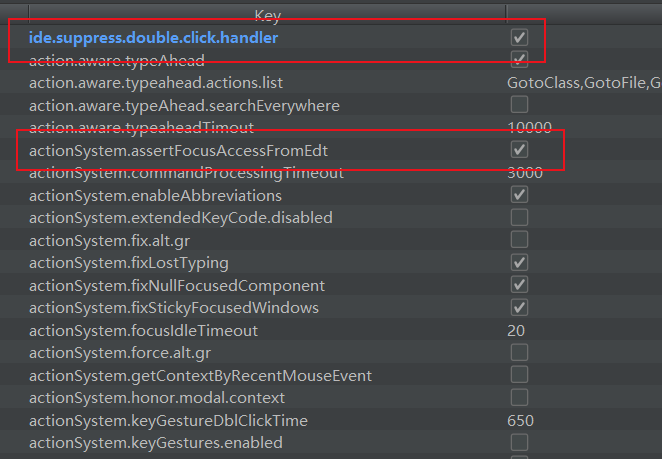
4.Update the value of
shift + ctrl + alt + / 四个按键一块按,选择Reg项
5.重启IDEA
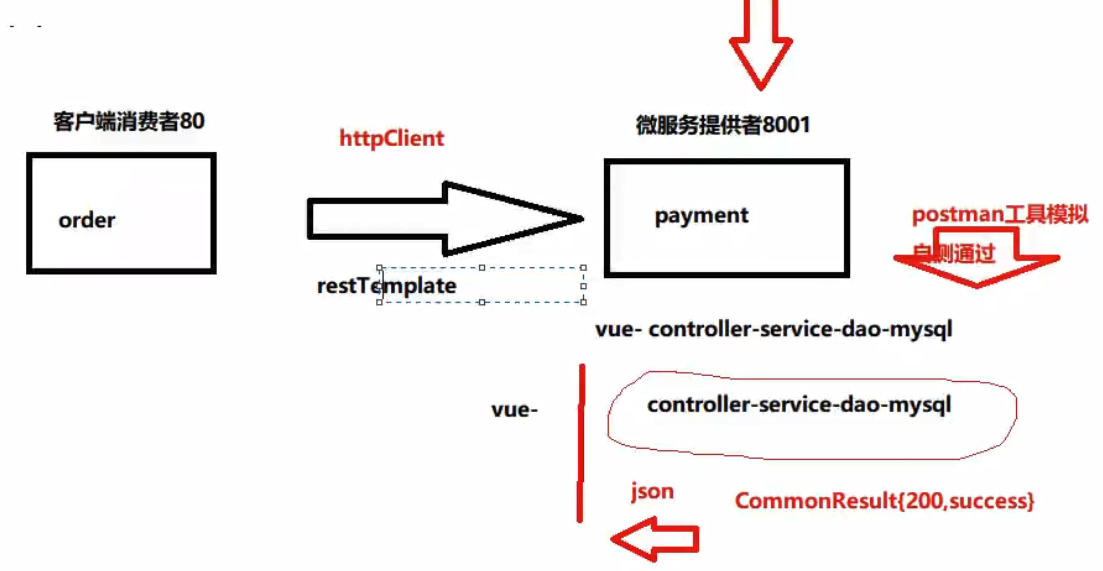
2.5 消费者订单模块 1.创建微服务消费者订单Module模块 2.pom 1 2 3 4 5 6 7 8 9 10 11 12 13 14 15 16 17 18 19 20 21 22 23 24 25 26 27 28 29 30 31 32 33 34 35 36 37 38 39 40 41 <?xml version="1.0" encoding="UTF-8"?> <project xmlns ="http://maven.apache.org/POM/4.0.0" xmlns:xsi ="http://www.w3.org/2001/XMLSchema-instance" xsi:schemaLocation ="http://maven.apache.org/POM/4.0.0 http://maven.apache.org/xsd/maven-4.0.0.xsd" > <parent > <artifactId > cloud2021</artifactId > <groupId > com.lq.springcloud</groupId > <version > 1.0-SNAPSHOT</version > </parent > <modelVersion > 4.0.0</modelVersion > <artifactId > cloud-consumer-order80</artifactId > <dependencies > <dependency > <groupId > org.springframework.boot</groupId > <artifactId > spring-boot-starter-web</artifactId > </dependency > <dependency > <groupId > org.springframework.boot</groupId > <artifactId > spring-boot-starter-actuator</artifactId > </dependency > <dependency > <groupId > org.springframework.boot</groupId > <artifactId > spring-boot-devtools</artifactId > <scope > runtime</scope > <optional > true</optional > </dependency > <dependency > <groupId > org.projectlombok</groupId > <artifactId > lombok</artifactId > <optional > true</optional > </dependency > <dependency > <groupId > org.springframework.boot</groupId > <artifactId > spring-boot-starter-test</artifactId > <scope > test</scope > </dependency > </dependencies > </project >
3.主启动类 1 2 3 4 5 6 @SpringBootApplication public class OrderMain public static void main (String[] args) SpringApplication.run(OrderMain.class,args); } }
4.业务类 订单也需要Payment、CommonResult实体类,但是不需要操作数据库,没有Service、Dao,只需添加Controller即可。
1 2 3 4 5 6 7 @Data @AllArgsConstructor @NoArgsConstructor public class Payment private Long id; private String serial; }
1 2 3 4 5 6 7 8 9 10 11 12 13 14 15 16 17 18 19 package com.atguigu.springcloud.entities;import lombok.AllArgsConstructor;import lombok.Data;import lombok.NoArgsConstructor;@Data @AllArgsConstructor @NoArgsConstructor public class CommonResult <T > private Integer code; private String message; private T data; public CommonResult (Integer code,String message) this (code,message,null ); } }
首说RestTemplate: RestTemplate提供了多种便捷访问远程Http服务的方法,是一种简单便捷的访问restful服务模板类,是Spring提供的用于访问Rest服务的客户端模板工具集 ,实现80到8001的远程调用。https://docs.spring.io/spring-framework/docs/5.2.2.RELEASE/javadoc-api/org/springframework/web/client/RestTemplate.html
将RestTemplate对象注册到容器中
1 2 3 4 5 6 7 @Configuration public class ApplicationContextConfig @Bean public RestTemplate getRestTemplate () return new RestTemplate(); } }
controller
1 2 3 4 5 6 7 8 9 10 11 12 13 14 15 16 17 @Controller @Slf4j public class OrderController private static final String PAYMENT_URL="http://localhost:8001" ; @Resource private RestTemplate restTemplate; @GetMapping("/consumer/payment/create") public CommonResult<Payment> create (Payment payment) return restTemplate.postForObject(PAYMENT_URL+"/payment/create" ,payment, CommonResult.class); } @GetMapping("/consumer/payment/get/{id}") public CommonResult<Payment> getPayment (@PathVariable("id") Long id) return restTemplate.getForObject(PAYMENT_URL+"/payment/get/" +id,CommonResult.class); } }
测试
1 2 http://localhost:8001/payment/get/31 http://localhost/consumer/payment/get/31
添加:
可以看到数据库只插入主键,并没有插入内容,要在8001的PaymentController加
@RequestBody注解
2.6 工程重构 项目中存在相同的代码(entities包下的Payment.class和CommonResult.class),造成代码冗余,可以进行重构。
建立公共module 导入依赖 1 2 3 4 5 6 7 8 9 10 11 12 13 14 15 16 17 18 19 20 21 22 23 24 25 26 27 28 29 30 31 32 <?xml version="1.0" encoding="UTF-8"?> <project xmlns ="http://maven.apache.org/POM/4.0.0" xmlns:xsi ="http://www.w3.org/2001/XMLSchema-instance" xsi:schemaLocation ="http://maven.apache.org/POM/4.0.0 http://maven.apache.org/xsd/maven-4.0.0.xsd" > <parent > <artifactId > cloud2021</artifactId > <groupId > com.lq.springcloud</groupId > <version > 1.0-SNAPSHOT</version > </parent > <modelVersion > 4.0.0</modelVersion > <artifactId > cloud-api-commons</artifactId > <dependencies > <dependency > <groupId > org.springframework.boot</groupId > <artifactId > spring-boot-devtools</artifactId > <scope > runtime</scope > <optional > true</optional > </dependency > <dependency > <groupId > org.projectlombok</groupId > <artifactId > lombok</artifactId > <optional > true</optional > </dependency > <dependency > <groupId > cn.hutool</groupId > <artifactId > hutool-all</artifactId > <version > 5.1.0</version > </dependency > </dependencies > </project >
将entities包复制到cloud-api-commons 使用Maven打包发布上传到公用本地库里 打开Maven窗口,执行clean测试一下,无误后出现BUILD SUCCESS,然后执行install
删除重复entities,引入maven install的jar包坐标即可使用。 1 2 3 4 5 6 <dependency > <groupId > com.lq.springcloud</groupId > <artifactId > cloud-api-commons</artifactId > <version > ${project.version}</version > </dependency >
三、Eureka服务注册与发现 1.概述 Eureka采用了CS的设计架构,Eureka Server作为服务注册功能的服务器,它是服务注册中心。而系统中的其他微服务,使用 Eureka的客户销连接到lfurela Sevef并维持心跳连接。这样系统的维护人员就可以通过Eureka Server 来监控系统中各个微服务是否正常运行。
Eureka包含两个组件: Eureka Server和Eureka ClientEureka Server 提供服务注册服务
EurekaClient 通过注册中心进行访问
3.服务器端安装 创建项目cloud-eureka-server7001
pom
1 2 3 4 5 6 7 8 9 10 11 12 13 14 15 16 17 18 19 20 21 22 23 24 25 26 27 28 29 30 31 32 33 34 35 36 37 38 39 40 41 42 43 44 45 46 47 48 49 50 51 52 53 54 55 <?xml version="1.0" encoding="UTF-8"?> <project xmlns ="http://maven.apache.org/POM/4.0.0" xmlns:xsi ="http://www.w3.org/2001/XMLSchema-instance" xsi:schemaLocation ="http://maven.apache.org/POM/4.0.0 http://maven.apache.org/xsd/maven-4.0.0.xsd" > <parent > <artifactId > cloud2021</artifactId > <groupId > com.lq.springcloud</groupId > <version > 1.0-SNAPSHOT</version > </parent > <modelVersion > 4.0.0</modelVersion > <artifactId > cloud-eureka-server7001</artifactId > <dependencies > <dependency > <groupId > org.springframework.cloud</groupId > <artifactId > spring-cloud-starter-netflix-eureka-server</artifactId > </dependency > <dependency > <groupId > com.lq.springcloud</groupId > <artifactId > cloud-api-commons</artifactId > <version > ${project.version}</version > </dependency > <dependency > <groupId > org.springframework.boot</groupId > <artifactId > spring-boot-starter-web</artifactId > </dependency > <dependency > <groupId > org.springframework.boot</groupId > <artifactId > spring-boot-starter-actuator</artifactId > </dependency > <dependency > <groupId > org.springframework.boot</groupId > <artifactId > spring-boot-devtools</artifactId > <scope > runtime</scope > <optional > true</optional > </dependency > <dependency > <groupId > org.projectlombok</groupId > <artifactId > lombok</artifactId > </dependency > <dependency > <groupId > org.springframework.boot</groupId > <artifactId > spring-boot-starter-test</artifactId > <scope > test</scope > </dependency > <dependency > <groupId > junit</groupId > <artifactId > junit</artifactId > </dependency > </dependencies > </project >
yml
1 2 3 4 5 6 7 8 9 10 11 12 13 14 15 server: port: 7001 eureka: instance: hostname: localhost client: register-with-eureka: false fetch-registry: false service-url: defaultZ4 one: http://${eureka.instance.hostname}:${server.port}/eureka/
主启动
1 2 3 4 5 6 7 @SpringBootApplication @EnableEurekaServer public class EurekaMain7001 public static void main (String[] args) SpringApplication.run(EurekaMain7001.class,args); } }
这是个服务注册中心,主要干的活就是服务注册,不需要写业务类。
测试 出现图标,表示Eureka 服务端安装成功。No instances available表示当前没有服务注册进来
4. 单机Eureka构建:支付微服务8001入驻进eurekaServer 将 Eureka-client 依赖引入,便于使用注解@EnableEurekaClient标注这是个Eureka Client端
1 2 3 4 5 <dependency > <groupId > org.springframework.cloud</groupId > <artifactId > spring-cloud-starter-netflix-eureka-client</artifactId > </dependency >
修改yml
1 2 3 4 5 6 7 8 eureka: client: register-with-eureka: true fetch-registry: true service-url: defaultZone: http://localhost:7001/eureka
主启动类添加注解@EnableEurekaClient
测试
这样就注册进来了,入住进Eureka服务器的名称就是8001yml中配置的spring.application.name。红色警告是Eureka的自我保护机制,后面会详细说。
5. 单机Eureka构建:订单微服务入驻进eurekaServer 同理
pom
yml
1 2 3 4 5 6 7 8 9 10 11 spring: application: name: cloud-order-server eureka: client: register-with-eureka: true fetch-registry: true service-url: defaultZone: http://localhost:7001/eureka
添加注解@EnableEurekaClient
测试
6.EurekaServer集群环境构建 微服务RPC远程服务调用最核心的是什么?
高可用,如果注册中心只有一个,出故障没了。注册中心集群
创建 cloud-eureka-server7002
1 2 3 4 5 6 7 8 9 10 11 12 13 14 15 16 17 18 19 20 21 22 23 24 25 26 27 28 29 30 31 32 33 34 35 36 37 38 39 40 41 42 43 44 45 46 47 48 49 50 51 52 53 54 55 56 <?xml version="1.0" encoding="UTF-8"?> <project xmlns ="http://maven.apache.org/POM/4.0.0" xmlns:xsi ="http://www.w3.org/2001/XMLSchema-instance" xsi:schemaLocation ="http://maven.apache.org/POM/4.0.0 http://maven.apache.org/xsd/maven-4.0.0.xsd" > <parent > <artifactId > cloud2021</artifactId > <groupId > com.atguigu.springcloud</groupId > <version > 1.0-SNAPSHOT</version > </parent > <modelVersion > 4.0.0</modelVersion > <artifactId > cloud-eureka-server7002</artifactId > <dependencies > <dependency > <groupId > org.springframework.cloud</groupId > <artifactId > spring-cloud-starter-netflix-eureka-server</artifactId > </dependency > <dependency > <groupId > com.lq.springcloud</groupId > <artifactId > cloud-api-commons</artifactId > <version > ${project.version}</version > </dependency > <dependency > <groupId > org.springframework.boot</groupId > <artifactId > spring-boot-starter-web</artifactId > </dependency > <dependency > <groupId > org.springframework.boot</groupId > <artifactId > spring-boot-starter-actuator</artifactId > </dependency > <dependency > <groupId > org.springframework.boot</groupId > <artifactId > spring-boot-devtools</artifactId > <scope > runtime</scope > <optional > true</optional > </dependency > <dependency > <groupId > org.projectlombok</groupId > <artifactId > lombok</artifactId > </dependency > <dependency > <groupId > org.springframework.boot</groupId > <artifactId > spring-boot-starter-test</artifactId > <scope > test</scope > </dependency > <dependency > <groupId > junit</groupId > <artifactId > junit</artifactId > </dependency > </dependencies > </project >
写yml之前修改映射文件
C:\Windows\System32\drivers\etc路径下的hosts文件
1 2 127.0.0.1 eureka7001.com 127.0.0.1 eureka7002.com
x修改yml
1 2 3 4 5 6 7 8 9 10 11 12 13 server: port: 7001 eureka: instance: hostname: eureka7001.com client: register-with-eureka: true fetch-registry: true service-url: defaultZone: http://eureka7002:7002/eureka/
8001和8002也都访问正常,那如果我们用80访问呢?发现怎么刷新都是8001,这是因为我们的源程序地址是写死的:
修改为动态的
1 2 3 4 5 6 7 8 9 10 11 12 13 14 15 16 17 18 19 20 @RestController @Slf4j public class OrderController private static final String PAYMENT_URL = "http://CLOUD-PROVIDER-SERVICE" ; @Resource private RestTemplate restTemplate; @GetMapping("/consumer/payment/create") public CommonResult<Payment> create (Payment payment) return restTemplate.postForObject(PAYMENT_URL+"/payment/create" ,payment,CommonResult.class); } @GetMapping("/consumer/payment/get/{id}") public CommonResult<Payment> getPayment (@PathVariable("id") Long id) return restTemplate.getForObject(PAYMENT_URL+"/payment/get/" +id,CommonResult.class); } }
发现报错了,现在对外暴露的不再是地址和端口,只认微服务名称了,可是微服务并不知道下面有几个,找不到这个主机名称,需要使用#LoadBalanced注解开启RestTemplate负载均衡功能。
@LoadBalanced注解让RestTemplate负载均衡
7.服务发现Discovery 对于注册进Eureka里面的微服务,可以通过服务发现来获得该服务的信息
1 2 3 4 5 6 7 8 9 10 11 12 13 14 15 16 17 18 @Resource private DiscoveryClient discoveryClient;GetMapping(value = "/payment/discovery" ) public object discovery () List<String> services = discoveryClicnt.getServices(); for (String element : services) { log.info("element : " +element); } list<ServiceInstance> instances = discoveryClient.getInstances("CLOUD-PROVIOER-SERVICE" ); for (ServiceInstance instance : instances){ log.info(instance.getServiceId()+"\t" +instance.getHost()+"\t" +instance.getPort()+"\t" +instance.getUri()); } return this .discoveryClient; }
主启动类加@EnableDiscoveryClient注解
8.Eureka自我保护 某时刻某一个微服务不可用了,Eureka不会立刻清理,依然会对该服务的信息进行保存
默认情况下,如果EurekaServer在一定时间内没有接收到某个微服务实例的心跳,EurekaServer将会注销该实例(默认90秒)。但是当网络分区故障发生(延时、卡顿、拥挤)时,微服务与EurekaServer之间无法正常通信,以上行为可能变得非常危险了——因为微服务本身其实是健康的,此时本不应该注销这个微服务 。Eureka通过“自我保护模式”来解决这个问题——当EurekaServer节点在短时间内丢失过多客户端时(可能发生了网络分区故障),那么这个节点就会进入自我保护模式。
服务端
eureka.server.enable-self-preservation = false可以禁用自我保护模式
eviction-interval-timer-in-ms: 2000 客户端向服务端发送心跳的时间间隔
客户端
eureka.instance.lease-renewal-interval-in-seconds=30 客户端向服务端发送心跳的时间间隔,默认30s
eureka.instance.lease-expiration-duration-in-seconds=90服务端在最后收到一次心跳的等待上限,超时剔除服务
四、Zookeeper服务注册与发现 老项目还可以继续使用Eureka,新项目可以使用其他技术:
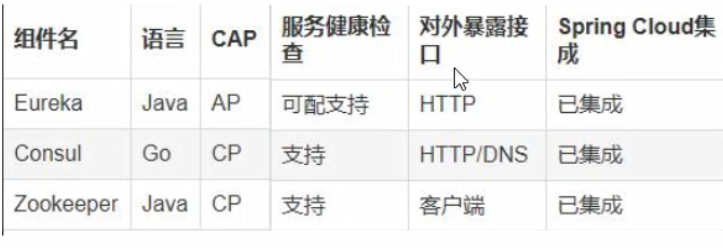
五、 Consul 三个注册中心异同点
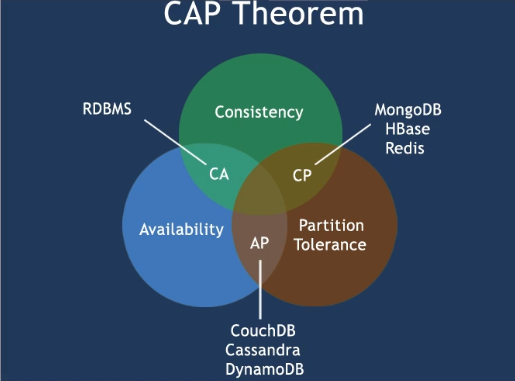
CAP CAP理论关注粒度是数据,而不是整体系统设计的策略
C:Consistency(强一致性)
A:Availability(可用性)
P:Partition tolerance(分区容错)
最多只能同时较好的满足两个 。一个分布式系统不可能同时很好的满足一致性,可用性和分区容错性这三个需求 ,因此,根据CAP原理将NoSQL数据库分成了满足CA原则、满足CP原则和满足AP原则三大类:CA-单点集群,满足─致性,可用性的系统,通常在可扩展性上不太强大。
六、Ribbon 负载规则替换 1.概述 Spring Cloud Ribbon是基于Netflix Ribbon实现的一套客户端负载均衡的工具 。
LB负载均衡(Load Balance)是什么?HA(高可用) 。常见的负载均衡有软件Nginx,LVS,硬件F5等。
Ribbon本地负载均衡客户端VS Nginx服务端负载均衡区别?Nginx是服务器负载均衡 ,客户端所有请求都会交给nginx,然后由nginx实现转发请求。即负载均衡是由服务端实现的。Ribbon本地负载均衡 ,在调用微服务接口时候,会在注册中心上获取注册信息服务列表之后缓存到VM本地,从而在本地实现RPC远程服务调用技术。
负载均衡+RestTemplate调用
总结:Ribbon其实就是一个软负载均衡的客户端组件,他可以和其他所需请求的客户端结合使用,和eureka结合只是其中的一个实例。
没有引入ribbon,eureka已经做了整合
1 2 3 4 <dependency > <groupld > org.springframework.cloud</groupld > <artifactld > spring-cloud-starter-netflix-ribbon</artifactld > </dependency >
2.RestTemplate的使用 https://docs.spring.io/spring-framework/docs/5.2.2.RELEASE/javadoc-api/org/springframework/web/client/RestTemplate.html
getForObject方法:json对象
getForEntity方法 :返回对象为ResponseEntit对象,包含响应中的一些重要信息,比如响应头,响应状态码,响应体
postForObject/postForEntity
3.Ribbon核心组件IRule IRule:根据特定算法从服务列表中选取一个要访问的服务
替换:
com.netflix.loadbalancer.RoundRobinRule 轮询
com.netflix.loadbalancer.RandomRule 随机
com.netflix.loadbalancer.RetryRule 先按照RoundRobinRule的策略获取服务,如果获取服务失败则在指定时间内会进行重试
WeightedResponseTimeRule 对RoundRobinRule的扩展,响应速度越快的实例选择权重越大,越容易被选择
BestAvailableRule 会先过滤掉由于多次访问故障而处于断路器跳闸状态的服务,然后选择一个并发量最小的服务
AvailabilityFilteringRule 先过滤掉故障实例,再选择并发较小的实例
ZoneAvoidanceRule 默认规则,复合判断server所在区域的性能和server的可用性选择服务器
修改order80
自定义配置类不能放在ComponentScan所扫描的包及子包下
不能和启动类在一个包下
1 2 3 4 5 6 7 8 9 @Configuration public class MySelfRule @Bean public IRule myRule () return new RandomRule(); } }
启动类 加上
1 @RibbonClient(name="CLOUD-PAYMENT-SERVICE",configuration = MySelfRule.class)
4.负载均衡算法 负载均衡算法: rest接口第几次请求数%服务器集群总数量=实际调用服务器位置下标,每次服务重启动后rest接口计数从1开始
1 2 3 4 List<ServiceInstance> instances = discoveryClient.getInstances("CLOUD-PAYMENT-SERVICE" ); List [0 ] instances = 127.0 .0 .1 :8002 List [1 ] instances = 127.0 .0 .1 :8001
手写
去掉@LoadBalanced
LoadBalanced接口
服务端
1 2 3 4 @GetMapping(value = "/payment/lb") public String getPaymentLB () return serverPort; }
接口
1 2 3 4 5 public interface LoadBalance ServiceInstance instances (List<ServiceInstance> serviceInstances) ; }
实例
1 2 3 4 5 6 7 8 9 10 11 12 13 14 15 16 17 18 19 20 21 22 23 @Component public class MLB implements LoadBalance private AtomicInteger atomicInteger = new AtomicInteger(0 ); public final int getAndIncrement () int current; int next; do { current = this .atomicInteger.get(); next = current >= 2147483647 ? 0 : current + 1 ; }while (!this .atomicInteger.compareAndSet(current,next)); System.out.println("*******next:" +next); return next; } @Override public ServiceInstance instances (List<ServiceInstance> serviceInstances) int index = getAndIncrement() % serviceInstances.size(); return serviceInstances.get(index); } }
controller
1 2 3 4 5 6 7 8 9 10 11 12 13 14 15 @Resource private LoadBalance loadBalance;@Resource private DiscoveryClient discoveryClient;@GetMapping(value = "/consumer/payment/lb") public String getPaymentLB () List<ServiceInstance> instances = discoveryClient.getInstances("CLOUD-PROVIDER-SERVICE" ); if (null == instances || instances.size() <= 0 ){ return null ; } ServiceInstance serviceInstance = loadBalance.instances(instances); URI uri = serviceInstance.getUri(); return restTemplate.getForObject(uri+"/payment/lb" ,String.class); }
七、OpenFeign服务接口调用 1.概述 https://cloud.spring.io/spring-cloud-static/Hoxton.SR1/reference/htmlsingle/#spring-cloud-openfeign 声明式WebService客户端 。使用Feign能让编写Web Service客户端更加简单。定义一个服务接口然后在上面添加注解。 Feign也支持可拔插式的编码器和解码器。Spring Cloud对Feign进行了封装,使其支持了Spring MVC标准注解和HttpMessageConverters。Feign可以与Eureka和Ribbon组合使用以支持负载均衡
https://github.com/spring-cloud/spring-cloud-openfeign
Feign能干什么Ribbon+RestTemplate 时,利用RestTemplate对http请求的封装处理,形成了一套模版化的调用方法。但是在实际开发中,由于对服务依赖的调用可能不止一处,往往一个接口会被多处调用,所以通常都会针对每个微服务自行封装一些客户端类来包装这些依赖服务的调用。 所以,Feign在此基础上做了进一步封装,由他来帮助我们定义和实现依赖服务接口的定义。在Feign的实现下,我们只需创建一个接口并使用注解的方式来配置它(以前是Dao接口上面标注Mapper注解,现在是一个微服务接口上面标注一个Feign注解即可) ,即可完成对服务提供方的接口绑定,简化了使用Spring cloud Ribbon时,自动封装服务调用客户端的开发量。通过feign只需要定义服务绑定接口且以声明式的方法 ,优雅而简单的实现了服务调用
OpenFeign是Spring Cloud在Feign的基础上支持了SpringMVC的注解,如@RequesMapping等等。OpenFeign的@FeignClient可以解析SpringMVC的@RequestMapping注解下的接口,并通过动态代理的方式产生实现类,实现类中做负载均衡并调用其他服务。
1 2 3 4 <dependency > <groupId > org.springframework.cloud</groupId > <artifactId > spring-cloud-starter-openfeign</artifactId > </dependency >
2.使用
@FeignClient
新建cloud-consumer-feign-order80
pom
1 2 3 4 5 6 7 8 9 10 11 12 13 14 15 16 17 18 19 20 21 22 23 24 25 26 27 28 29 30 31 32 33 34 35 36 37 38 39 40 41 42 43 44 45 46 47 48 49 50 51 52 53 54 55 56 <?xml version="1.0" encoding="UTF-8"?> <project xmlns ="http://maven.apache.org/POM/4.0.0" xmlns:xsi ="http://www.w3.org/2001/XMLSchema-instance" xsi:schemaLocation ="http://maven.apache.org/POM/4.0.0 http://maven.apache.org/xsd/maven-4.0.0.xsd" > <parent > <artifactId > cloud2021</artifactId > <groupId > com.lq.springcloud</groupId > <version > 1.0-SNAPSHOT</version > </parent > <modelVersion > 4.0.0</modelVersion > <artifactId > cloud-consumer-feign-order80</artifactId > <dependencies > <dependency > <groupId > org.springframework.cloud</groupId > <artifactId > spring-cloud-starter-openfeign</artifactId > </dependency > <dependency > <groupId > org.springframework.boot</groupId > <artifactId > spring-boot-starter-web</artifactId > </dependency > <dependency > <groupId > org.springframework.boot</groupId > <artifactId > spring-boot-starter-actuator</artifactId > </dependency > <dependency > <groupId > org.springframework.boot</groupId > <artifactId > spring-boot-devtools</artifactId > <scope > runtime</scope > <optional > true</optional > </dependency > <dependency > <groupId > org.projectlombok</groupId > <artifactId > lombok</artifactId > <optional > true</optional > </dependency > <dependency > <groupId > org.springframework.boot</groupId > <artifactId > spring-boot-starter-test</artifactId > <scope > test</scope > </dependency > <dependency > <groupId > com.lq.springcloud</groupId > <artifactId > cloud-api-commons</artifactId > <version > ${project.version}</version > </dependency > <dependency > <groupId > org.springframework.cloud</groupId > <artifactId > spring-cloud-starter-netflix-eureka-client</artifactId > </dependency > </dependencies > </project >
主启动类
1 2 3 4 5 6 7 @SpringBootApplication @EnableFeignClients public class OrderFeignMain80 public static void main (String[] args) SpringApplication.run(OrderFeignMain80.class,args); } }
service
1 2 3 4 5 6 @Component @FeignClient(value = "CLOUD-PROVIDER-SERVICE") public interface PaymentFeignService @GetMapping(value = "/payment/get/{id}") public CommonResult<Payment> getPaymentById (@PathVariable(value = "id") Long id) }
controller
1 2 3 4 5 6 7 8 9 10 11 12 13 @RestController @Slf4j public class OrderFeignController @Resource private PaymentFeignService paymentFeignService; @GetMapping(value = "/consumer/payment/get/{id}") public CommonResult<Payment> getPaymentById (@PathVariable("id") Long id) return paymentFeignService.getPaymentById(id); } }
默认Feign客户端只等待一秒钟,但是服务端处理需要超过1秒钟,导致Feign客户端不想等待了,直接返回报错。为了避免这样的情况,有时候我们需要设置Feign客户端的超时控制。
1 2 3 4 5 6 ribbon: ReadTimeout: 5000 ConnectTimeout: 5000
日志
1 2 3 4 5 6 7 8 @Configuration public class FeignConfig @Bean Logger.Level feignLoggerLevel () { return Logger.Level.FULL; } }
yml
1 2 3 logging: level: com.atguigu.springcloud.service.PaymentFeignService: debug
八、Hystrix断路器 1.概述 服务雪崩 多个微服务之间调用的时候,假设微服务A调用微服务B和微服务C,微服务B和微服务C又调用其它的微服务,这就是所谓的“扇出 ”。如果扇出的链路上某个微服务的调用响应时间过长或者不可用,对微服务A的调用就会占用越来越多的系统资源,进而引起系统崩溃,所谓的“雪崩效应”.
是什么 Hystrix是一个用于处理分布式系统的延迟和容错的开源库 ,在分布式系统里,许多依赖不可避免的会调用失败,比如超时、异常等,Hystrix能够保证在一个依赖出问题的情况下,不会导致整体服务失败,避免级联故障,以提高分布式系统的弹性。调用方返回一个符合预期的、可处理的备选响应(FallBack),而不是长时间的等待或者抛出调用方无法处理的异常 ,这样就保证了服务调用方的线程不会被长时间、不必要地占用,从而避免了故障在分布式系统中的蔓延,乃至雪崩。
停更
https://github.com/Netflix/Hystrix/wiki/How-To-Use
2.Hystrix重要概念 服务降级 服务器忙,请稍候再试,不让客户端等待并立刻返回一个友好提示,fallback
哪些情况会触发降级
程序运行异常
超时
服务熔断触发服务降级
线程池/信号量打满也会导致服务降级
服务熔断 类比保险丝达到最大服务访问后,直接拒绝访问,拉闸限电,然后调用服务降级的方法并返回友好提示
就是保险丝
服务的降级->进而熔断->恢复调用链路
服务限流 秒杀高并发等操作,严禁一窝蜂的过来拥挤,大家排队,一秒钟N个,有序进行
3.案例 新建cloud-provider-hystrix-payment8001
pom
1 2 3 4 5 6 7 8 9 10 11 12 13 14 15 16 17 18 19 20 21 22 23 24 25 26 27 28 29 30 31 32 33 34 35 36 37 38 39 40 41 42 43 44 45 46 47 48 49 50 51 52 53 54 55 56 <?xml version="1.0" encoding="UTF-8"?> <project xmlns ="http://maven.apache.org/POM/4.0.0" xmlns:xsi ="http://www.w3.org/2001/XMLSchema-instance" xsi:schemaLocation ="http://maven.apache.org/POM/4.0.0 http://maven.apache.org/xsd/maven-4.0.0.xsd" > <parent > <artifactId > cloud2021</artifactId > <groupId > com.lq.springcloud</groupId > <version > 1.0-SNAPSHOT</version > </parent > <modelVersion > 4.0.0</modelVersion > <artifactId > cloud-provider-hystrix-payment8001</artifactId > <dependencies > <dependency > <groupId > org.springframework.cloud</groupId > <artifactId > spring-cloud-starter-netflix-hystrix</artifactId > </dependency > <dependency > <groupId > org.springframework.boot</groupId > <artifactId > spring-boot-starter-web</artifactId > </dependency > <dependency > <groupId > org.springframework.boot</groupId > <artifactId > spring-boot-starter-actuator</artifactId > </dependency > <dependency > <groupId > org.springframework.boot</groupId > <artifactId > spring-boot-devtools</artifactId > <scope > runtime</scope > <optional > true</optional > </dependency > <dependency > <groupId > org.projectlombok</groupId > <artifactId > lombok</artifactId > <optional > true</optional > </dependency > <dependency > <groupId > org.springframework.boot</groupId > <artifactId > spring-boot-starter-test</artifactId > <scope > test</scope > </dependency > <dependency > <groupId > com.lq.springcloud</groupId > <artifactId > cloud-api-commons</artifactId > <version > ${project.version}</version > </dependency > <dependency > <groupId > org.springframework.cloud</groupId > <artifactId > spring-cloud-starter-netflix-eureka-client</artifactId > </dependency > </dependencies > </project >
yml
1 2 3 4 5 6 7 8 9 10 11 12 13 14 15 server: port: 8001 spring: application: name: cloud-provider-hystrix-payment eureka: client: register-with-eureka: true fetch-registry: true service-url: defaultZone: http://localhost:7001/eureka
主启动类
1 2 3 4 5 6 7 @SpringBootApplication @EnableEurekaClient public class PaymentHystrixMain8001 { public static void main(String[] args) { SpringApplication.run(PaymentHystrixMain8001.class,args); } }
service
1 2 3 4 5 6 7 8 9 10 11 12 13 14 15 16 17 18 19 20 21 22 @Service public class PaymentService public String paymentInfo_Ok (Integer id) return "线程池:" +Thread.currentThread().getName()+" paymentInfo_Ok,id:" +id+"\t" +"O(∩_∩)O哈哈~" ; } public String paymentInfo_TimeOut (Integer id) int timeNumber = 3 ; try { TimeUnit.SECONDS.sleep(3 ); }catch (InterruptedException e){ e.printStackTrace(); } return "线程池:" +Thread.currentThread().getName()+" paymentInfo_TimeOut,id:" +id+"\t" +"O(∩_∩)O哈哈~" +" 耗时" +timeNumber+"s" ; } }
controller
1 2 3 4 5 6 7 8 9 10 11 12 13 14 15 16 17 18 19 20 21 22 23 @RestController @Slf4j public class PaymentController @Resource private PaymentService paymentService; @Value("${server.port}") private String serverPort; @GetMapping("/payment/hystrix/ok/{id}") public String paymentInfo_Ok (@PathVariable("id") Integer id) String result = paymentService.paymentInfo_Ok(id); return result; } @GetMapping("/payment/hystrix/timeout/{id}") public String paymentInfo_TimeOut (@PathVariable("id") Integer id) String result = paymentService.paymentInfo_TimeOut(id); return result; } }
测试
以上述为根基平台,从正确->错误->降级熔断->恢复
上述在非高并发情形下,还能勉强满足 but…..
开启Jmeter,来20000个并发压死8001,20000个请求都去访问paymentInfo_TimeOut服务
上面还是服务提供者8001自己测试,假如此时外部的消费者80也来访问,那消费者只能干等,最终导致消费端80不满意,服务端8001直接被拖死
创建cloud-consumer-feign-hystrix-order80 同理
原因
8001同一层次的其他接口服务被困死,因为tomcat线程里面的工作线程已经被挤占完毕
80此时调用8001,客户端访问响应缓慢,转圈圈
如何解决?解决的要求
超时导致服务器变慢(转圈)超时不再等待
出错(宕机或程序运行出错)出错要有兜底
解决
对方服务(8001)超时了,调用者(80)不能一直卡死等待,必须有服务降级
对方服务(8001)down机了,调用者(80)不能一直卡死等待,必须有服务降级
对方服务(8001)OK,调用者(80)自己出故障或有自我要求(自己的等待时间小于服务提供者),自己处理降级
服务降级 @HystrixCommand
8001先从自身找问题
设置自身调用超时时间的峰值,峰值内可以正常运行,超过了需要有兜底的方法处理,作服务降级fallback
@HystrixCommand报异常后如何处理 service
1 2 3 4 5 6 7 8 9 10 11 12 13 14 15 16 17 @HystrixCommand(fallbackMethod = "paymentInfo_TimeOutHandler",commandProperties = { @HystrixProperty(name="execution.isolation.thread.timeoutInMilliseconds",value = "3000") }) public String paymentInfo_TimeOut (Integer id) int timeNumber = 5 ; try { TimeUnit.SECONDS.sleep(3 ); }catch (InterruptedException e){ e.printStackTrace(); } return "线程池:" +Thread.currentThread().getName()+" paymentInfo_TimeOut,id:" +id+"\t" +"O(∩_∩)O哈哈~" +" 耗时" +timeNumber+"s" ; } public String paymentInfo_TimeOutHandler (Integer id) return "线程池:" +Thread.currentThread().getName()+" paymentInfo_TimeOut,id:" +id+"\t" +"o(╥﹏╥)o" ; }
主启动类添加新注解@EnableCircuitBreaker
@HystrixCommand报异常后如何处理
一旦调用服务方法失败并抛出了错误信息后,会自动调用@HystrixCommand标注好的fallbackMethod调用类中的指定方法
总结
80fallback 一般降级都是在客户端
1 2 3 feign: hystrix: enabled: true
主启动类加@EnableHystrix
controller
1 2 3 4 5 6 7 8 9 10 11 12 @GetMapping("/consumer/payment/hystrix/timeout/{id}") @HystrixCommand(fallbackMethod = "paymentTimeOutFallbackMethod", commandProperties = { @HystrixProperty(name = "execution.isolation.thread.timeoutInMilliseconds", value = "1500") }) public String paymentInfo_TimeOut (@PathVariable("id") Integer id) String result = paymentHystrixService.paymentInfo_TimeOut(id); return result; } public String paymentTimeOutFallbackMethod (@PathVariable("id") Integer id) return "我是消费者80,对付支付系统繁忙请10秒钟后再试或者自己运行出错请检查自己,(┬_┬)" ; }
每个业务方法对应一个兜底的方法,代码膨胀
统一和自定义的分开
@DefaultProperties(defaultFallback = “”)
1 2 3 4 public String payment_Global_FallbackMethod () return "Global异常处理信息,请稍后再试,(┬_┬)" ; }
1 2 3 4 @DefaultProperties(defaultFallback = "payment_Global_FallbackMethod") @HystrixCommand
服务降级,客户端去调用服务端,碰上服务端宕机或关闭
本次案例服务降级处理是在客户端80实现完成的,与服务端8001没有关系,只需要为Feign客户端定义的接口添加一个服务降级处理的实现类即可实现解耦
修改cloud-consumer-feign-hystrix-order80
根据cloud-consumer-feign-hystrix-order80已经有的PaymentHystrixService接口,重新新建一个类(PaymentFallbackService)实现该接口,统一为接口里面的方法进行异常处理
1 2 3 4 5 6 7 8 9 10 @Component @FeignClient(value = "CLOUD-PROVIDER-HYSTRIX-PAYMENT",fallback = PaymentFallbackService.class) public interface PaymentHystrixService @GetMapping("/payment/hystrix/ok/{id}") public String paymentInfo_Ok (@PathVariable("id") Integer id) @GetMapping("/payment/hystrix/timeout/{id}") public String paymentInfo_TimeOut (@PathVariable("id") Integer id) }
1 2 3 feign: hystrix: enabled: true
此时服务端provider已经down了,但是我们做了服务降级处理,让客户端在服务端不可用时也会获得提示信息而不会挂起耗死服务器
服务熔断 论文https://martinfowler.com/bliki/CircuitBreaker.html
熔断机制概述当检测到该节点微服务调用响应正常后,恢复调用链路。
1 2 3 4 5 6 7 8 9 10 11 12 13 14 15 16 17 @HystrixCommand(fallbackMethod = "paymentCircuitBreaker_fallback",commandProperties = {//10s内10次请求失败6次 @HystrixProperty(name = "circuitBreaker.enabled",value = "true"), //是否开启断路器 @HystrixProperty(name = "circuitBreaker.requestVolumeThreshold",value="10"),//请求次数 @HystrixProperty(name = "circuitBreaker.sleepWindowInMilliseconds",value="10000"),//时间范围 @HystrixProperty(name = "circuitBreaker.errorThresholdPercentage",value="60"),//失败率达到多少后跳闸 }) public String paymentCircuitBreaker (@PathVariable("id") Integer id) if ( id < 0 ){ throw new RuntimeException("*****id 不能负数" ); } String serialNumber=IdUtil.simpleUUID(); return Thread.currentThread().getName()+"\t" +"调用成功,流水号:" +serialNumber; } public String paymentCircuitBreaker_fallback (@PathVariable("id") Integer id) return "id 不能负数,请稍候再试,(┬_┬)/~~ id: " +id; }
1 2 3 4 5 6 7 @GetMapping("/payment/circuit/{id}") public String paymentCircuitBreaker (@PathVariable("id") Integer id) String result = paymentService.paymentCircuitBreaker(id); log.info("*****result:" +result); return result; }
多次错误,然后慢慢正确,发现刚开始不满足条件,就算是正确的访问地址也不能进行访问,需要慢慢的恢复链路
总结 熔断类型
熔断打开:请求不再进行调用当前服务,内部设置时钟一般为MTTR(平均故障处理时间),当打开时长达到所设时钟则进入熔断状态
熔断关闭:熔断关闭不会对服务进行熔断
熔断半开:部分请求根据规则调用当前服务,如果请求成功且符合规则则认为当前服务恢复正常,关闭熔断
涉及到断路器的三个重要参数:快照时间窗、请求总数阀值、错误百分比阀值。
快照时间窗:断路器确定是否打开需要统计一些请求和错误数据,而统计的时间范围就是快照时间窗,默认为最近的10秒。
请求总数阀值:在快照时间窗内,必须满足请求总数阀值才有资格熔断。默认为20,意味着在10秒内,如果该hystrx命令的调用次数不足20次,即使所有的请求都超时或其他原因失败,断路器都不会打开。
错误百分比阀值:当请求总数在快照时间窗内超过了阀值,比如发生了30次调用,如果在这30次调用中,有15次发生了超时异常,也就是超过50%的错误百分比,在默认设定50%阀值情况下,这时候就会将断路器打开。
4.原理 https://github.com/Netflix/Hystrix/wiki/How-it-Works
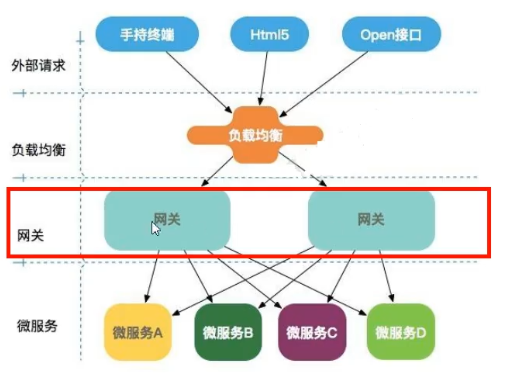
九、Gateway新一代网关 1.概述 https://cloud.spring.io/spring-cloud-static/spring-cloud-gateway/2.2.1.RELEASE/reference/html/
Spring Cloud Gateway 使用的Webflux中的reactor-netty响应式编程组件,底层使用了Netty通讯框架
能干什么
为什么用gateway springcloud gateway特性
基于Spring Framework 5, Project Reactor和Spring Boot 2.0进行构建 ;
三大核心概念 Route(路由):
路由是构建网关的基本模块,它由ID,目标URI,一系列的断言和过滤器组成,如果断言为true则匹配该路由
Predicate(断言)
参考的是java8的java.util.function.Predicate开发人员可以匹配HTTP请求中的所有内容(例如请求头或请求参数),如果请求与断言相匹配则进行路由
Filter(过滤)
指的是Spring框架中GatewayFilter的实例,使用过滤器,可以在请求被路由前或者之后对请求进行修改。
web请求,通过一些匹配条件,定位到真正的服务节点。并在这个转发过程的前后,进行一些精细化控制。
2.案例 cloud-gateway-gateway9527
pom
1 2 3 4 5 6 7 8 9 10 11 12 13 14 15 16 17 18 19 20 21 22 23 24 25 26 27 28 29 30 31 32 33 34 35 36 37 38 39 40 41 42 43 44 45 46 47 48 49 50 51 52 53 54 55 56 57 58 <?xml version="1.0" encoding="UTF-8"?> <project xmlns ="http://maven.apache.org/POM/4.0.0" xmlns:xsi ="http://www.w3.org/2001/XMLSchema-instance" xsi:schemaLocation ="http://maven.apache.org/POM/4.0.0 http://maven.apache.org/xsd/maven-4.0.0.xsd" > <parent > <artifactId > cloud2021</artifactId > <groupId > com.lq.springcloud</groupId > <version > 1.0-SNAPSHOT</version > </parent > <modelVersion > 4.0.0</modelVersion > <artifactId > cloud-gateway-gateway9527</artifactId > <dependencies > <dependency > <groupId > org.springframework.cloud</groupId > <artifactId > spring-cloud-starter-gateway</artifactId > </dependency > <dependency > <groupId > org.springframework.boot</groupId > <artifactId > spring-boot-starter-web</artifactId > </dependency > <dependency > <groupId > org.springframework.boot</groupId > <artifactId > spring-boot-starter-actuator</artifactId > </dependency > <dependency > <groupId > org.springframework.boot</groupId > <artifactId > spring-boot-devtools</artifactId > <scope > runtime</scope > <optional > true</optional > </dependency > <dependency > <groupId > org.projectlombok</groupId > <artifactId > lombok</artifactId > <optional > true</optional > </dependency > <dependency > <groupId > org.springframework.boot</groupId > <artifactId > spring-boot-starter-test</artifactId > <scope > test</scope > </dependency > <dependency > <groupId > org.springframework.cloud</groupId > <artifactId > spring-cloud-starter-netflix-eureka-client</artifactId > </dependency > <dependency > <groupId > com.lq.springcloud</groupId > <artifactId > cloud-api-commons</artifactId > <version > ${project.version}</version > </dependency > </dependencies > </project >
1 2 3 4 5 6 7 8 9 10 11 12 13 14 15 16 17 server: port: 9527 spring: application: name: cloud-gateway eureka: instance: hostname: cloud-gateway-service client: register-with-eureka: true fetch-registry: true service-url: defaultZone: http://localhost:7001/eureka
1 2 3 4 5 6 7 8 @SpringBootApplication @EnableEurekaClient public class GateWayMain9527 public static void main (String[] args) SpringApplication.run(GateWayMain9527.class,args); } }
9527网关如何做路由映射那???
cloud-provider-payment8001看看controller的访问地址
我们目前不想暴露8001端口,希望在8001外面套一层9527
9527yml
1 2 3 4 5 6 7 8 9 10 11 12 13 14 15 spring: application: name: cloud-gateway cloud: gateway: routes: - id: payment_routh uri: http://localhost:8001 predicates: - Path=/payment/get/** - id: payment_routh2 uri: http://localhost:8001 predicates: - Path=/payment/lb/**
启动7001/8001/9527
去掉下面的
1 2 3 4 5 6 7 8 9 <dependency > <groupId > org.springframework.boot</groupId > <artifactId > spring-boot-starter-web</artifactId > </dependency > <dependency > <groupId > org.springframework.boot</groupId > <artifactId > spring-boot-starter-actuator</artifactId > </dependency >
测试
http://localhost:8001/payment/get/31
http://localhost:9527/payment/get/31
yml配置说明
1.yaml配置
2.代码中注入RouteLocator的Bean
3.动态路由配置 1 2 3 4 5 6 7 8 9 10 11 12 13 14 15 spring: application: name: cloud-gateway cloud: gateway: discovery: locator: enabled: true routes: - id: payment_routh uri: lb://cloud-payment-service predicates: - Path=/payment/get/**
4.Predicate的使用 配置信息加强
官网
5.Filter 路由过滤器可用于修改进入的HTTP请求和返回的HTTP响应,路由过滤器只能指定路由进行使用。
生命周期,Only Two:pre,post
自定义
1 2 3 4 5 6 7 8 9 10 11 12 13 14 15 16 17 18 19 20 21 @Component @Slf4j public class MyLogGateWayFilter implements GlobalFilter , Ordered @Override public Mono<Void> filter (ServerWebExchange exchange, GatewayFilterChain chain) log.info("**********come in MyLogGateWayFilter" + new Date()); String uname = exchange.getRequest().getQueryParams().getFirst("uname" ); if (null == uname){ log.info("********用户名非法" ); exchange.getResponse().setStatusCode(HttpStatus.NOT_ACCEPTABLE); return exchange.getResponse().setComplete(); } return chain.filter(exchange); } @Override public int getOrder () return 0 ; } }
十、SpringCloud config分布式配置中心 1.概述 分布式系统面临的配置问题?
微服务意味着要将单体应用中的业务拆分成一个个子服务,每个服务的粒度相对较小,因此系统中会出现大量的服务。由于每个服务都需要必要的配置信息才能运行,所以一套集中式的、动态的配置管理设施是必不可少的。
SpringCloud Config为微服务架构中的微服务提供集中化的外部配置支持,配置服务器为各个不同微服务应用的所有环境提供了一个中心化的外部配置。
https://cloud.spring.io/spring-cloud-static/spring-cloud-config/2.2.1.RELEASE/reference/html/