在 Spring IOC(3) 我们介绍了Spring IOC中的prepareRefresh、obtainFreshBeanFactory、prepareBeanFactory。
本章介绍AbstractApplicationContext#refresh的第7, 8, 10个方法,国际化和事件发布。第9个方法onRefresh刷新蓉器这个方法是一个空方法,由子类实现,这里直接跳过了。
国际化 单纯的Spring中设置国际化实际上是体现不出来的,需要用到Spring MVC 才能有所体现。
初始化国际化 1 2 3 4 5 6 7 8 9 10 11 12 13 14 15 16 17 18 19 20 21 22 23 24 25 26 27 28 29 30 31 32 33 protected void initMessageSource () ConfigurableListableBeanFactory beanFactory = getBeanFactory(); if (beanFactory.containsLocalBean(MESSAGE_SOURCE_BEAN_NAME)) { this .messageSource = beanFactory.getBean(MESSAGE_SOURCE_BEAN_NAME, MessageSource.class); if (this .parent != null && this .messageSource instanceof HierarchicalMessageSource) { HierarchicalMessageSource hms = (HierarchicalMessageSource) this .messageSource; if (hms.getParentMessageSource() == null ) { hms.setParentMessageSource(getInternalParentMessageSource()); } } if (logger.isTraceEnabled()) { logger.trace("Using MessageSource [" + this .messageSource + "]" ); } } else { DelegatingMessageSource dms = new DelegatingMessageSource(); dms.setParentMessageSource(getInternalParentMessageSource()); this .messageSource = dms; beanFactory.registerSingleton(MESSAGE_SOURCE_BEAN_NAME, this .messageSource); if (logger.isTraceEnabled()) { logger.trace("No '" + MESSAGE_SOURCE_BEAN_NAME + "' bean, using [" + this .messageSource + "]" ); } } }
首先是从容器中获取MessageSource接口的实现,如果存在则直接赋值给AbstractApplicationContext的messageSource属性,用于解析国际化和参数化。如果没有就直接new一个委派的实现类,然后赋值给messageSource属性,并注册到容器中。
在Spring中提供了两个默认的实现:
ResourceBundleMessageSource :基于Java的ResourceBundle基础类实现,允许仅通过资源名加载国际化资源ReloadableResourceBundleMessageSource:这个功能和第一个类的功能类似,多了定时刷新功能,允许在不重启系统的情况下,更新资源的信息
国际化的使用 通常我们在ApplicationContext类型的容器中使用国际化3个步骤
创建国际化文件
向容器中注册一个MessageSource类型的bean,bean名称必须为:messageSource
1 2 3 4 5 6 7 8 9 10 @Configuration public class MessageConfig @Bean public ResourceBundleMessageSource messageSource () ResourceBundleMessageSource result = new ResourceBundleMessageSource(); result.setBasenames("i18n/message" ); return result; } }
调用AbstractApplicationContext中的getMessage来获取国际化信息,其内部将交给第二步中注册的messageSource名称的bean进行处理
1 2 3 4 5 6 7 8 9 @ComponentScan("com.lq.spring") public class Context public static void main (String[] args) ApplicationContext ac = new AnnotationConfigApplicationContext(Context.class); System.out.println(ac.getMessage("username" , null , Locale.CHINA)); } }
事件发布 初始化多播器、刷新容器、注册监听器 refresh的第8个方法initApplicationEventMulticaster初始化多播器
1 2 3 4 5 6 7 8 9 10 11 12 13 14 15 16 17 18 19 20 protected void initApplicationEventMulticaster () ConfigurableListableBeanFactory beanFactory = getBeanFactory(); if (beanFactory.containsLocalBean(APPLICATION_EVENT_MULTICASTER_BEAN_NAME)) { this .applicationEventMulticaster = beanFactory.getBean(APPLICATION_EVENT_MULTICASTER_BEAN_NAME, ApplicationEventMulticaster.class); if (logger.isTraceEnabled()) { logger.trace("Using ApplicationEventMulticaster [" + this .applicationEventMulticaster + "]" ); } } else { this .applicationEventMulticaster = new SimpleApplicationEventMulticaster(beanFactory); beanFactory.registerSingleton(APPLICATION_EVENT_MULTICASTER_BEAN_NAME, this .applicationEventMulticaster); if (logger.isTraceEnabled()) { logger.trace("No '" + APPLICATION_EVENT_MULTICASTER_BEAN_NAME + "' bean, using " + "[" + this .applicationEventMulticaster.getClass().getSimpleName() + "]" ); } } }
registerListeners注册监听器:
1 2 3 4 5 6 7 8 9 10 11 12 13 14 15 16 17 18 19 20 21 22 23 24 25 26 27 protected void registerListeners () for (ApplicationListener<?> listener : getApplicationListeners()) { getApplicationEventMulticaster().addApplicationListener(listener); } String[] listenerBeanNames = getBeanNamesForType(ApplicationListener.class, true , false ); for (String listenerBeanName : listenerBeanNames) { getApplicationEventMulticaster().addApplicationListenerBean(listenerBeanName); } Set<ApplicationEvent> earlyEventsToProcess = this .earlyApplicationEvents; this .earlyApplicationEvents = null ; if (!CollectionUtils.isEmpty(earlyEventsToProcess)) { for (ApplicationEvent earlyEvent : earlyEventsToProcess) { getApplicationEventMulticaster().multicastEvent(earlyEvent); } } }
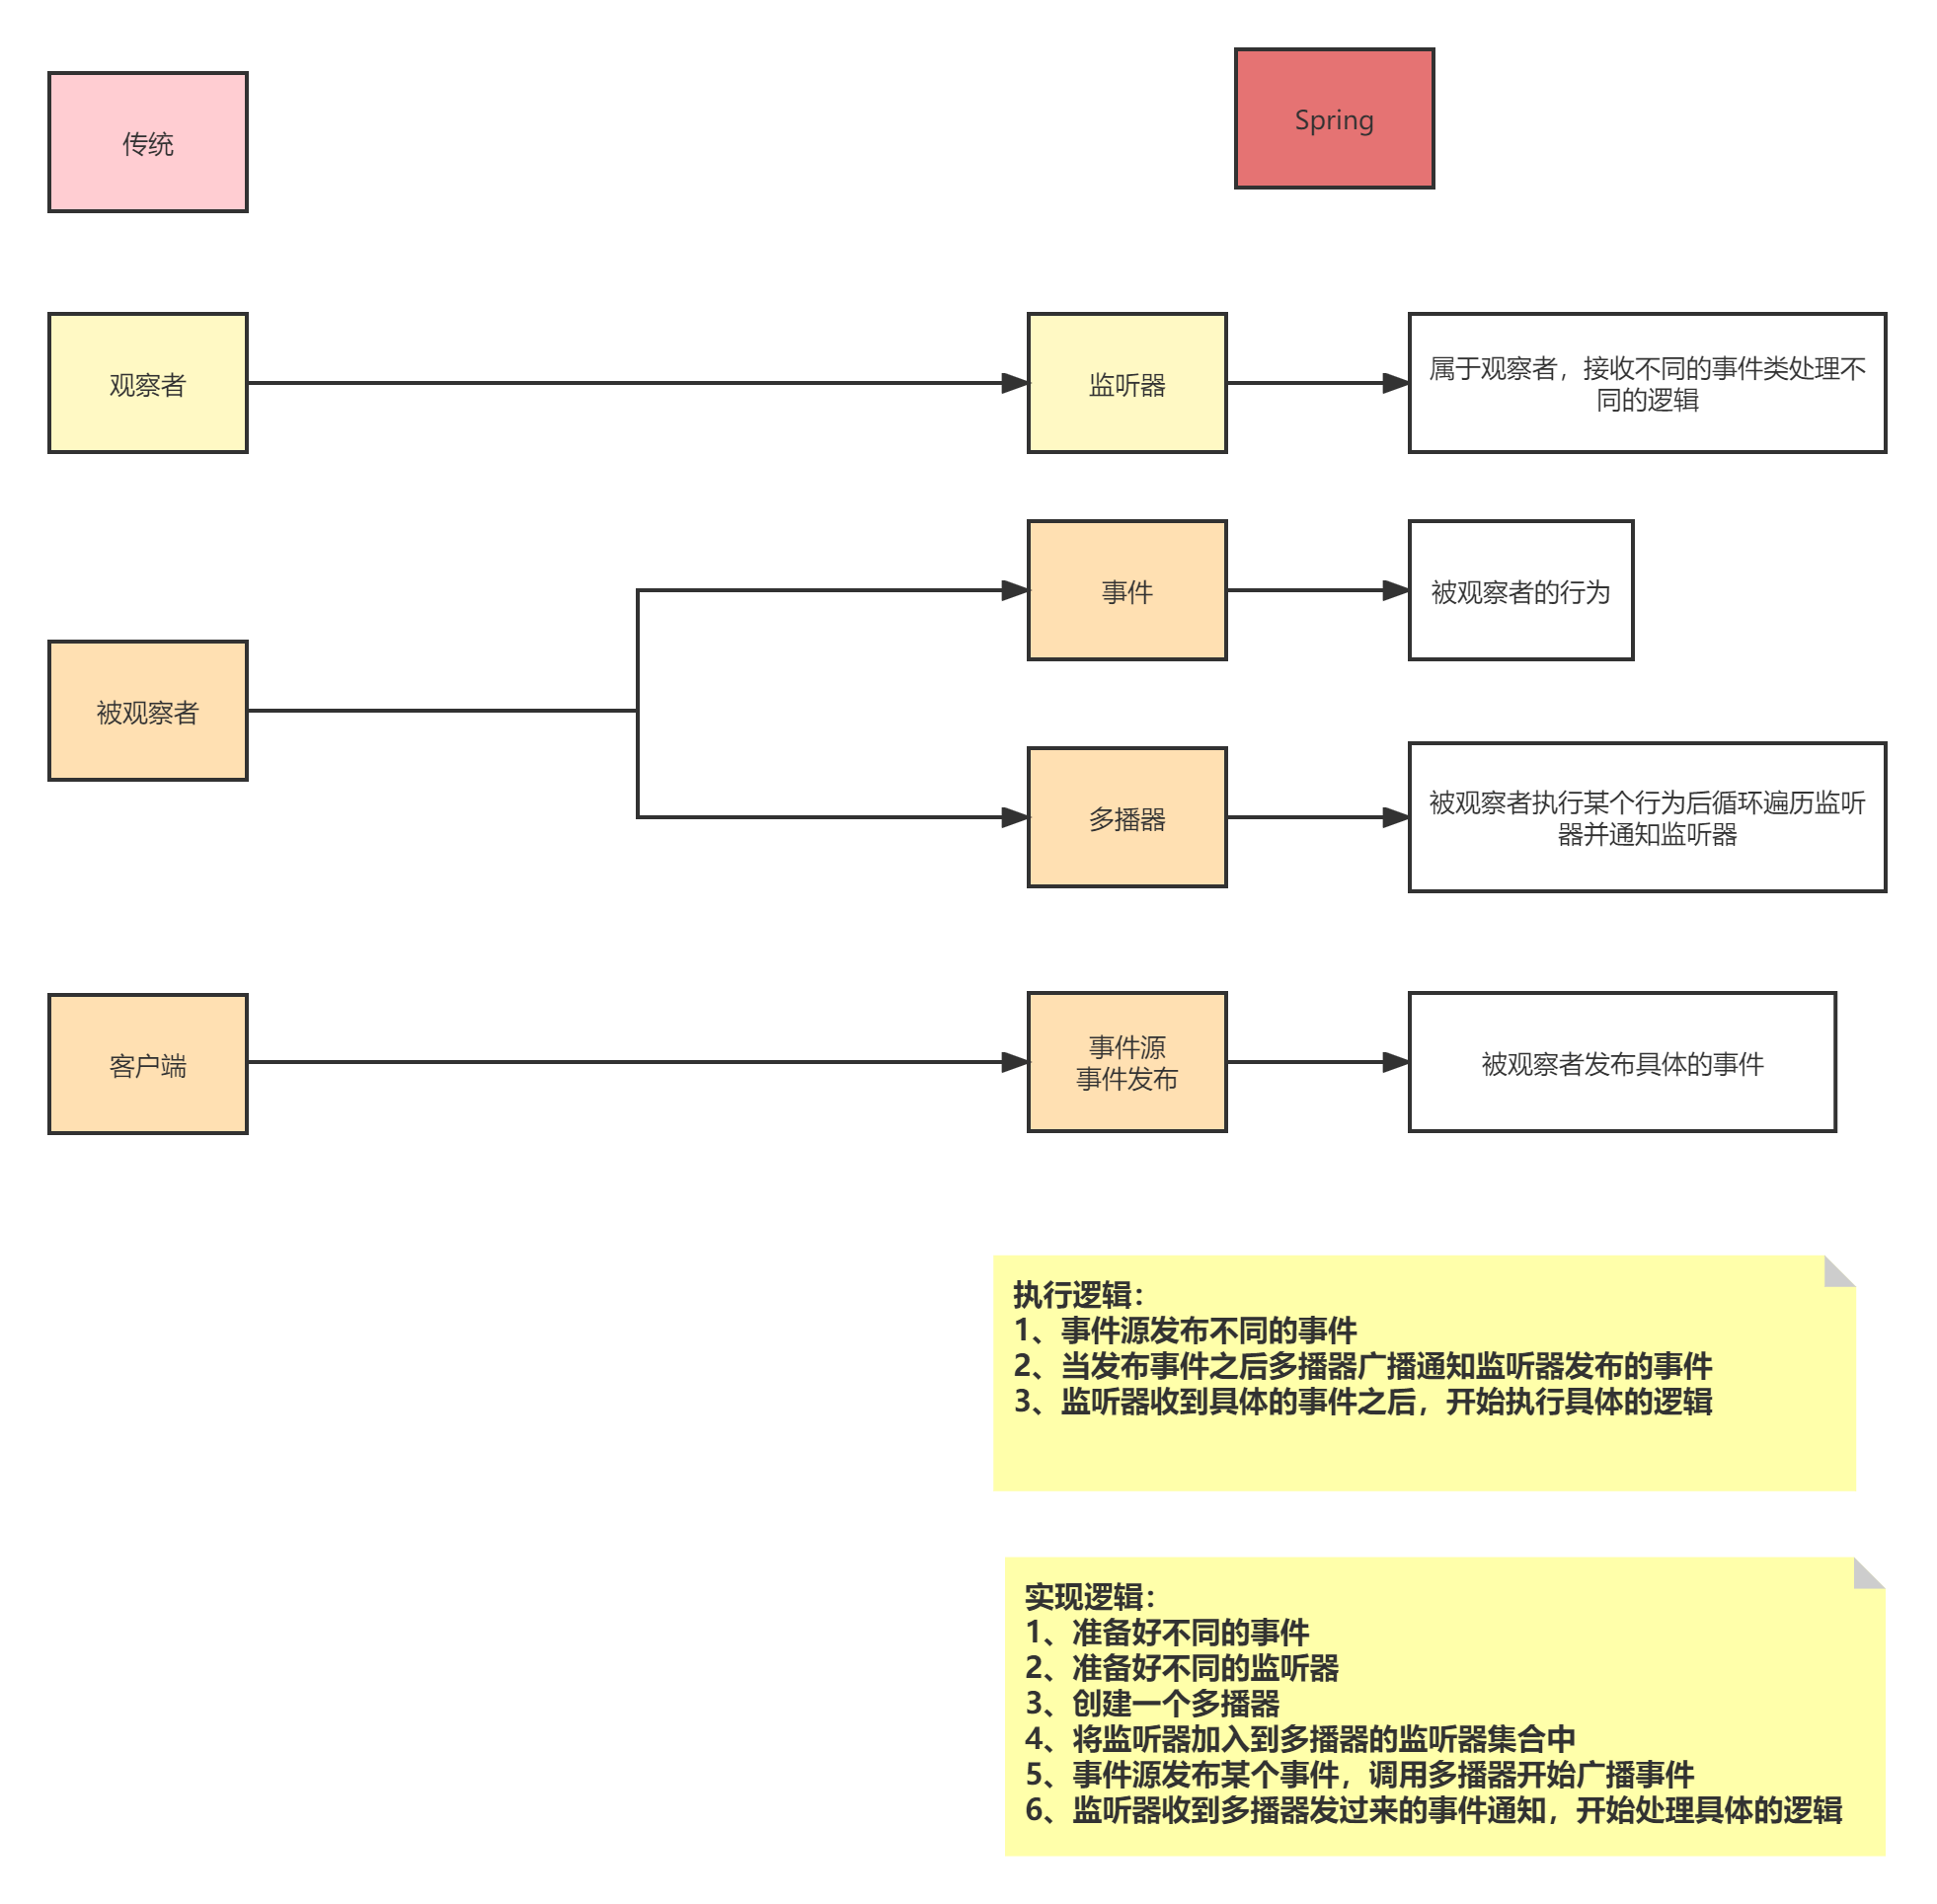
Spring的事件发布是如何设计的? Spring的事件机制实际上是使用了观察者模式进行设计的,观察者模式分为两大角色,观察者和被观察者,只是Spring更加的抽象,在Spring中分为:
事件ApplicationEvent。被观察者角色,监听器重点监听对象
监听器ApplicationListener。观察者角色,用来监听对应的事件,做相应的处理
事件发布者ApplicationEventPublisher。用来创建并发布事件
事件的多播器ApplicationEventMulticaster。拥有监听器对象,提供发布事件的功能,遍历监听器,监听器来处理自己需要处理的事件,ApplicationEventMulticaster 是 ApplicationEventPublisher 的底层实现
AbstractApplicationContext这个Spring 的BeanFactory容器就是实现了ApplicationEventPublisher,可以对事件进行发布。在Spring中内置了很多的事件,比如:ContextClosedEvent、ContextRefreshedEvent、ContextStartedEvent、ContextStopedEvent,而监听器的话Spring内置不多,Spring还提供了注解方式的配置监听器,注解为@EventListener。
官网提供了两种配置监听器的方式,一种是实现ApplicationListener接口,一种是使用@EventLister注解配置,基于注解还可以配置异步的,排序的。
在自定义的事件发布时需要实现ApplicationEventPublisherAware 接口获取到ApplicationEventPublisher 进行发布事件。
示例 代码是Spring官网提供的,功能就是如果邮箱被拉黑,那么就不发送消息给邮箱,而是发布一个事件进行其他处理
定义一个事件源发布者:用来处理黑名单的邮箱
1 2 3 4 5 6 7 8 9 10 11 12 13 14 15 16 17 18 19 20 21 22 23 24 25 26 27 28 29 30 31 32 33 34 35 36 37 38 @Service public class EmailService implements ApplicationEventPublisherAware private List<String> blackList; private ApplicationEventPublisher applicationEventPublisher; public EmailService () { blackList = new ArrayList<>(); blackList.add("123@qq.com" ); } public List<String> getBlackList () return blackList; } public void setBlackList (List<String> blackList) this .blackList = blackList; } @Override public void setApplicationEventPublisher (ApplicationEventPublisher applicationEventPublisher) this .applicationEventPublisher = applicationEventPublisher; } public void sendEmail (String address, String context) if (blackList.contains(address)){ applicationEventPublisher.publishEvent(new EmailEvent(this , address, context)); return ; } System.out.println(".......发送邮箱 ......" ); } }
定义事件
1 2 3 4 5 6 7 8 9 10 11 12 13 14 15 16 17 18 19 20 21 22 23 24 25 public class EmailEvent extends ApplicationEvent private final String address; private final String context; public EmailEvent (Object source, String address, String context) super (source); this .address = address; this .context = context; } @Override public String toString () return "EmailEvent{" + "address='" + address + '\'' + ", context='" + context + '\'' + '}' ; } }
定义监听器
1 2 3 4 5 6 7 8 9 10 11 12 13 14 15 16 17 18 19 @Service public class EmailApplicationListener implements ApplicationListener <EmailEvent > private String notifyAddress; public String getNotifyAddress () return notifyAddress; } public void setNotifyAddress (String notifyAddress) this .notifyAddress = notifyAddress; } @Override public void onApplicationEvent (EmailEvent event) System.out.println("收到事件,开始发布" ); System.out.println("发送消息给" + notifyAddress + event.toString()); } }
定义客户端
1 2 3 4 5 6 7 8 9 @ComponentScan("com.lq.spring") public class Context public static void main (String[] args) ApplicationContext ac = new AnnotationConfigApplicationContext(Context.class); EmailService bean = ac.getBean(EmailService.class); bean.sendEmail("123@qq.com" , "test" ); } }
结果
1 2 收到事件,开始发布 发送消息给nullEmailEvent{address ='123@qq.com' , context ='test' }
当然可有使用注解@EventListener进行配置:
1 2 3 4 5 6 7 8 9 10 11 12 13 14 15 16 17 18 19 @Component public class EmailNotifier private String notifyAddress; public String getNotifyAddress () return notifyAddress; } public void setNotifyAddress (String notifyAddress) this .notifyAddress = notifyAddress; } @EventListener public void processMessage (EmailEvent event) System.out.println("收到事件,开始发布" ); System.out.println("发送消息给" + notifyAddress + event.toString()); } }
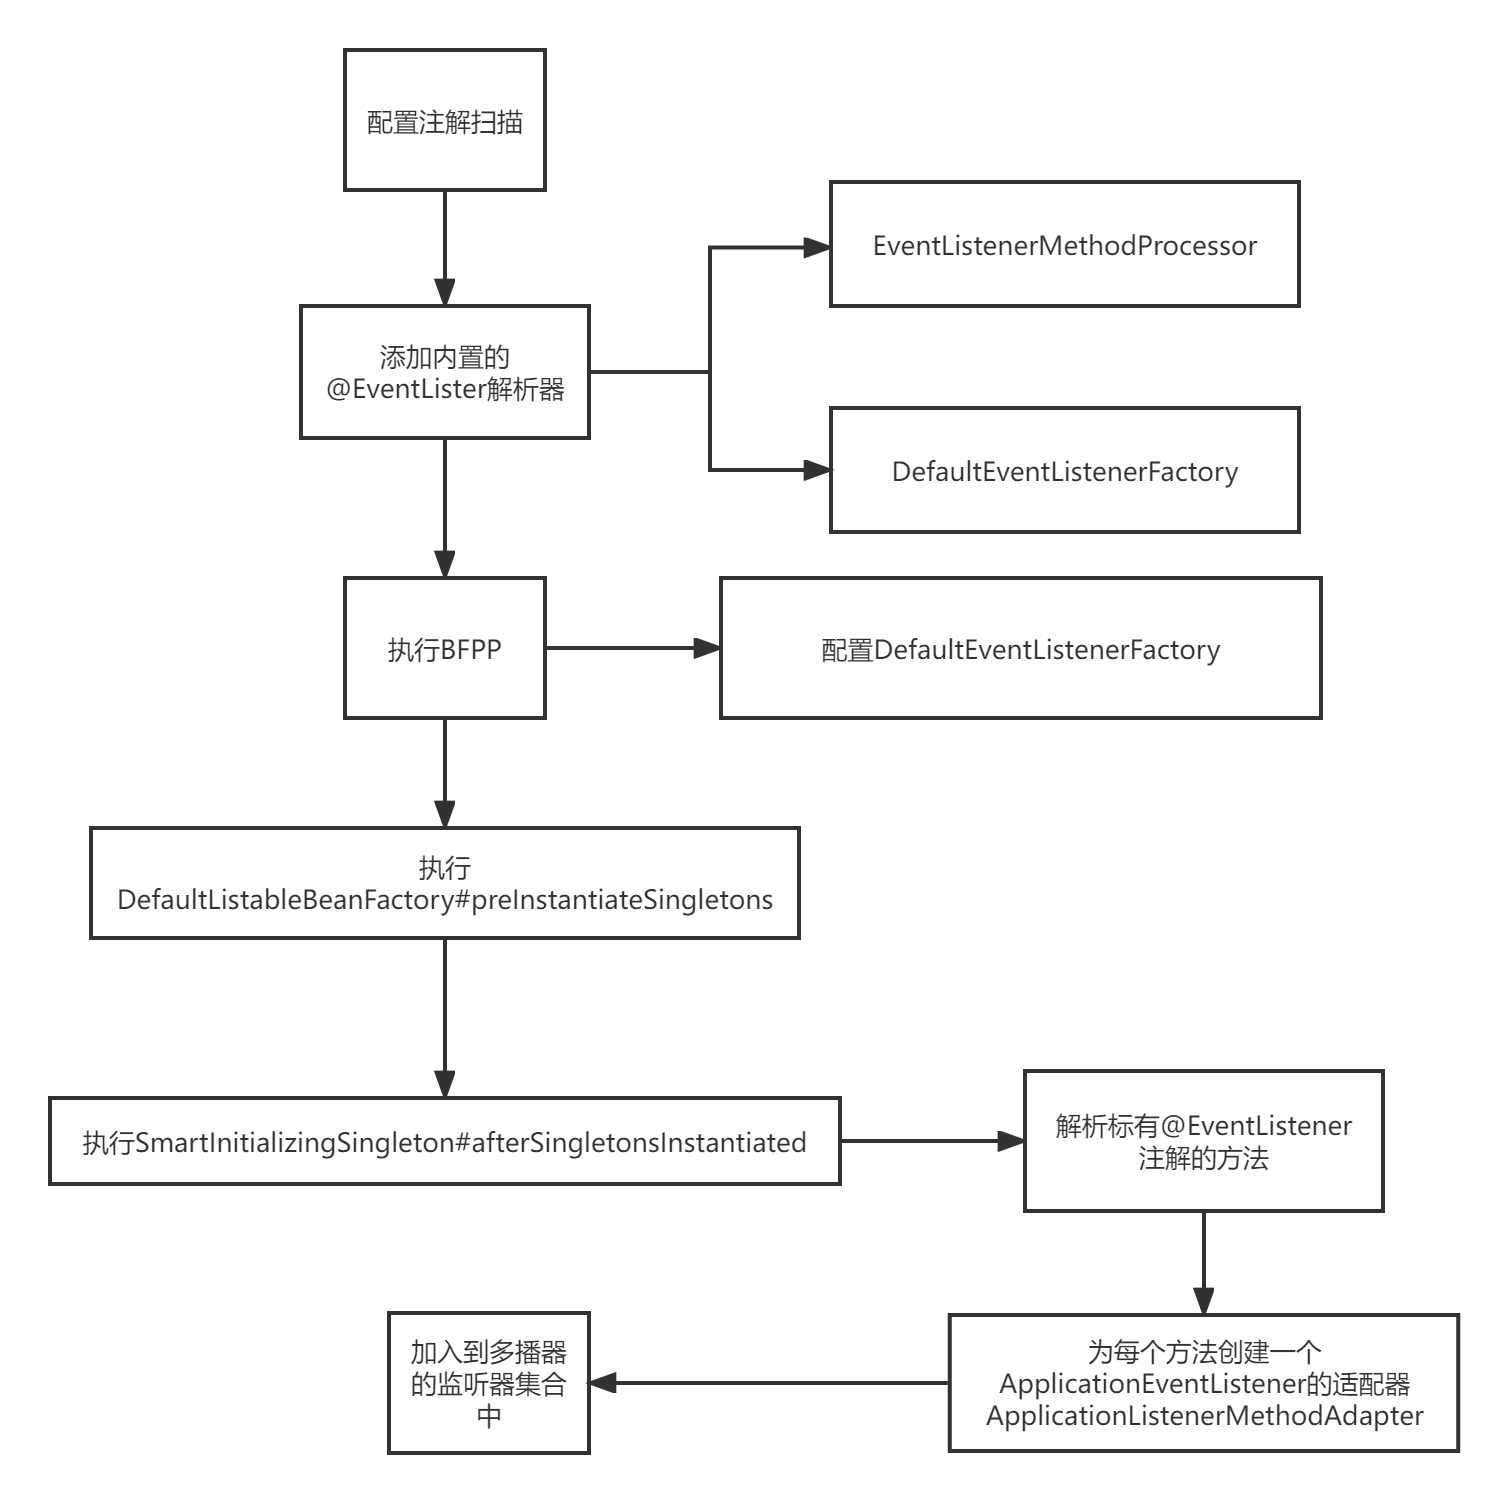
@EventListener解析流程 在Spring对注解进行扫描的时候,Spring会默认在容器中添加几个内置的Bean,并且以internalBean对象,这些Bean都是在AnnotationConfigUtils这个类的registerAnnotationConfigProcessors中设置的
1 2 3 4 5 6 7 8 9 10 11 12 13 14 if (!registry.containsBeanDefinition(EVENT_LISTENER_PROCESSOR_BEAN_NAME)) { RootBeanDefinition def = new RootBeanDefinition(EventListenerMethodProcessor.class); def.setSource(source); beanDefs.add(registerPostProcessor(registry, def, EVENT_LISTENER_PROCESSOR_BEAN_NAME)); } if (!registry.containsBeanDefinition(EVENT_LISTENER_FACTORY_BEAN_NAME)) { RootBeanDefinition def = new RootBeanDefinition(DefaultEventListenerFactory.class); def.setSource(source); beanDefs.add(registerPostProcessor(registry, def, EVENT_LISTENER_FACTORY_BEAN_NAME)); }
设置了一个EventListenerMethodProcessor类还有一个DefaultEventListenerFactory,这两个类分别用来解析@EvenListener和创建ApplicationListener接口的适配器。
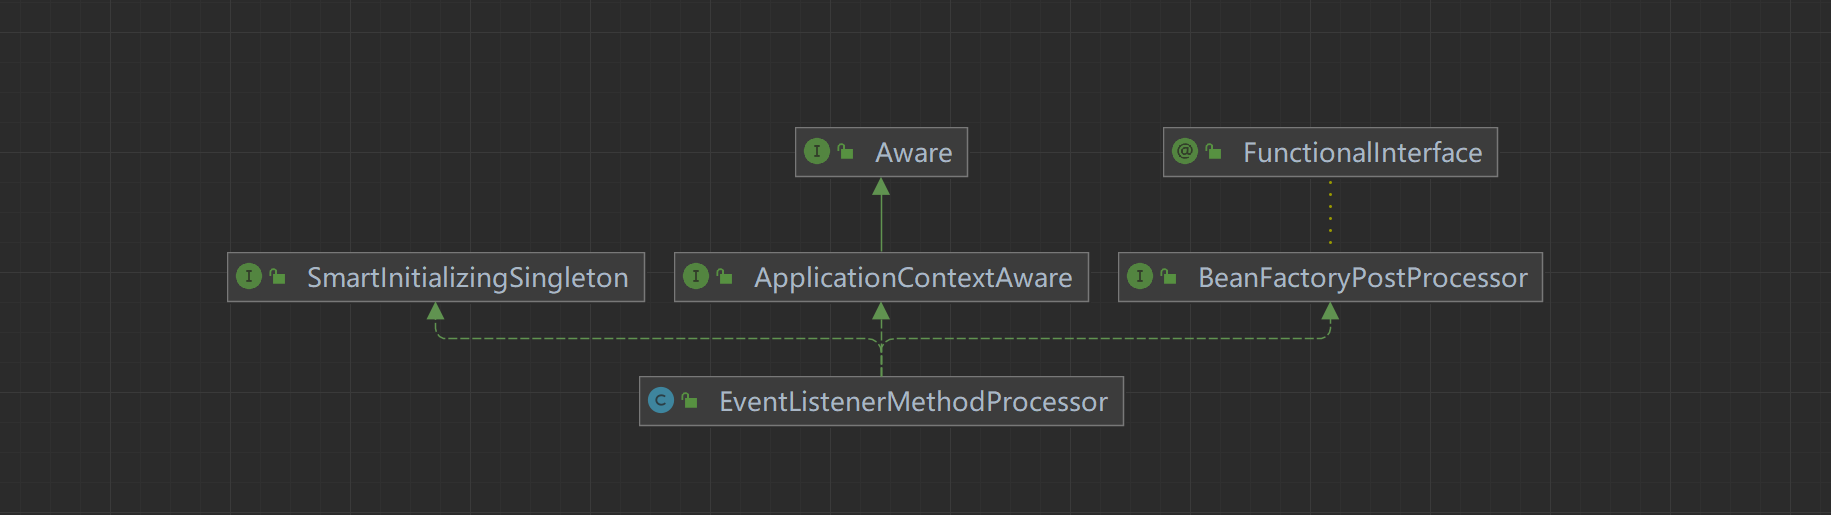
EventListenerMethodProcessor 实现了Bean
FactoryPostProcessor接口、SmartInitializingSingleton接口和ApplicationContextAware接口,BeanFactoryPostProcessor接口是用来对BeanDefinition进行个性化设置解析等操作,SmartInitializingSingleton接口是在初始化所有的单例Bean之后触发的,也就是在preInstantiateSingletons方法中初始化Bean之后调用,ApplicationContextAware是用来获取ApplicationContext的。
EventListenerMethodProcessor的 postProcessBeanFactory方法
1 2 3 4 5 6 7 8 9 @Override public void postProcessBeanFactory (ConfigurableListableBeanFactory beanFactory) this .beanFactory = beanFactory; Map<String, EventListenerFactory> beans = beanFactory.getBeansOfType(EventListenerFactory.class, false , false ); List<EventListenerFactory> factories = new ArrayList<>(beans.values()); AnnotationAwareOrderComparator.sort(factories); this .eventListenerFactories = factories; }
EventListenerFactory接口
1 2 3 4 5 6 7 8 9 10 11 public interface EventListenerFactory boolean supportsMethod (Method method) ApplicationListener<?> createApplicationListener(String beanName, Class<?> type, Method method); }
这个类有2个实现DefaultEventListenerFactory和TransactionalEventListenerFactory,EventListenerMethodProcessor使用策略模式,调用者两个类,把符合要求的方法封装成ApplicationLister对象,注册到上下文(上下文会把它们注册到多播器)
封装成ApplicationListener
在afterSingletonsInstantiated方法中实现,在bean初始化后会被容器回调使用,获取容器中所有的bean,调用processBean方法把其中标注@EventListener的方法,or @EventListener符合注册的方法,包装一个ApplicationListener 并且注册到上下文中
EventListenerMethodProcessor类中processBean的部分代码:
1 2 3 4 5 6 7 8 9 10 11 12 13 14 15 16 17 18 19 20 21 22 23 24 for (Method method : annotatedMethods.keySet()) { for (EventListenerFactory factory : factories) { if (factory.supportsMethod(method)) { Method methodToUse = AopUtils.selectInvocableMethod(method, context.getType(beanName)); ApplicationListener<?> applicationListener = factory.createApplicationListener(beanName, targetType, methodToUse); if (applicationListener instanceof ApplicationListenerMethodAdapter) { ((ApplicationListenerMethodAdapter) applicationListener).init(context, this .evaluator); } context.addApplicationListener(applicationListener); break ; } } } public ApplicationListener<?> createApplicationListener(String beanName, Class<?> type, Method method) { return new ApplicationListenerMethodAdapter(beanName, type, method); }
经典的 策略(2种策略)+工厂(创建ApplicationListener)+ 责任链设计模式
ApplicationListenerMethodAdapter DefaultEventListenerFactory 这个类是在DefaultEventListenerFactory方法中创建而出的一个ApplicationListener适配器
1 2 3 4 5 6 7 8 9 10 11 12 13 public ApplicationListenerMethodAdapter (String beanName, Class<?> targetClass, Method method) this .beanName = beanName; this .method = BridgeMethodResolver.findBridgedMethod(method); this .targetMethod = (!Proxy.isProxyClass(targetClass) ? AopUtils.getMostSpecificMethod(method, targetClass) : this .method); this .methodKey = new AnnotatedElementKey(this .targetMethod, targetClass); EventListener ann = AnnotatedElementUtils.findMergedAnnotation(this .targetMethod, EventListener.class); this .declaredEventTypes = resolveDeclaredEventTypes(method, ann); this .condition = (ann != null ? ann.condition() : null ); this .order = resolveOrder(this .targetMethod); }
处理事件
1 2 3 4 5 6 7 8 9 10 11 12 public void processEvent (ApplicationEvent event) Object[] args = resolveArguments(event); if (shouldHandle(event, args)) { Object result = doInvoke(args); if (result != null ) { handleResult(result); } else { logger.trace("No result object given - no result to handle" ); } } }
TransactionalEventListenerFactory 事务时讨论
发布事件 在refresh方法的最后一个 方法finishRefresh中有个方法
1 2 3 4 5 6 7 8 9 10 11 12 13 14 15 16 17 18 19 20 21 22 23 24 25 26 27 28 29 30 31 32 33 34 35 36 37 38 39 publishEvent(new ContextRefreshedEvent(this )); protected void publishEvent (Object event, @Nullable ResolvableType eventType) Assert.notNull(event, "Event must not be null" ); ApplicationEvent applicationEvent; if (event instanceof ApplicationEvent) { applicationEvent = (ApplicationEvent) event; } else { applicationEvent = new PayloadApplicationEvent<>(this , event); if (eventType == null ) { eventType = ((PayloadApplicationEvent<?>) applicationEvent).getResolvableType(); } } if (this .earlyApplicationEvents != null ) { this .earlyApplicationEvents.add(applicationEvent); } else { getApplicationEventMulticaster().multicastEvent(applicationEvent, eventType); } if (this .parent != null ) { if (this .parent instanceof AbstractApplicationContext) { ((AbstractApplicationContext) this .parent).publishEvent(event, eventType); } else { this .parent.publishEvent(event); } } }
跟进SimpleApplicationEventMulticaster#multicastEvent(applicationEvent, eventType);
1 2 3 4 5 6 7 8 9 10 11 12 13 14 15 16 17 18 public void multicastEvent (final ApplicationEvent event, @Nullable ResolvableType eventType) ResolvableType type = (eventType != null ? eventType : resolveDefaultEventType(event)); Executor executor = getTaskExecutor(); for (ApplicationListener<?> listener : getApplicationListeners(event, type)) { if (executor != null ) { executor.execute(() -> invokeListener(listener, event)); } else { invokeListener(listener, event); } } }
参考
https://blog.csdn.net/chenzoff/article/details/124682235
https://www.cnblogs.com/redwinter/p/16229572.html
https://www.cnblogs.com/cuzzz/p/16609679.html