在上节中,将述了Spring Bean的实例化,循环依赖在Spring中是如何解决的,这一节 继续完成Bean的创建流程。
对象的属性填充
属性填充,可能会涉及到很多东西,比如填充的属性是基本类型还是引用类型,填充的方式又可以分为按类型、按名称还是其他的,然后填充时值的类型是否需要进行类型转换等。
1
| populateBean(beanName, mbd, instanceWrapper);
|
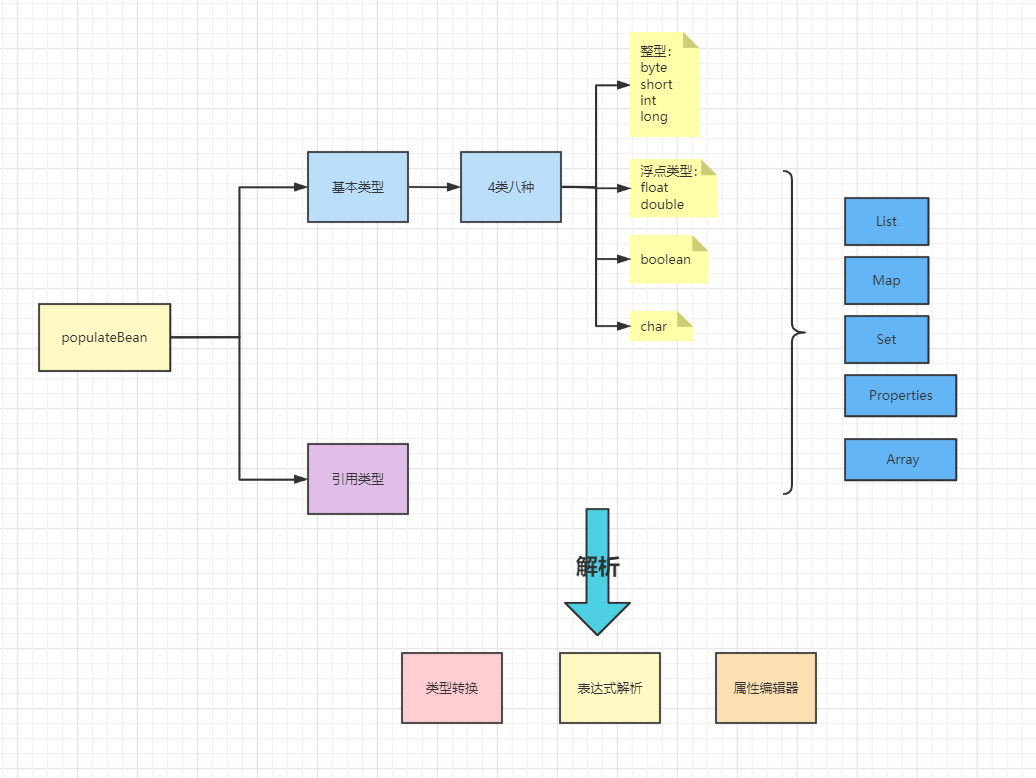
属性填充大致可以分为对基本类型的数据进行填充和对应用类型的数据填充,populateBean方法中代码比较繁琐,会设计到很多的递归调用,最终解析并填充属性。
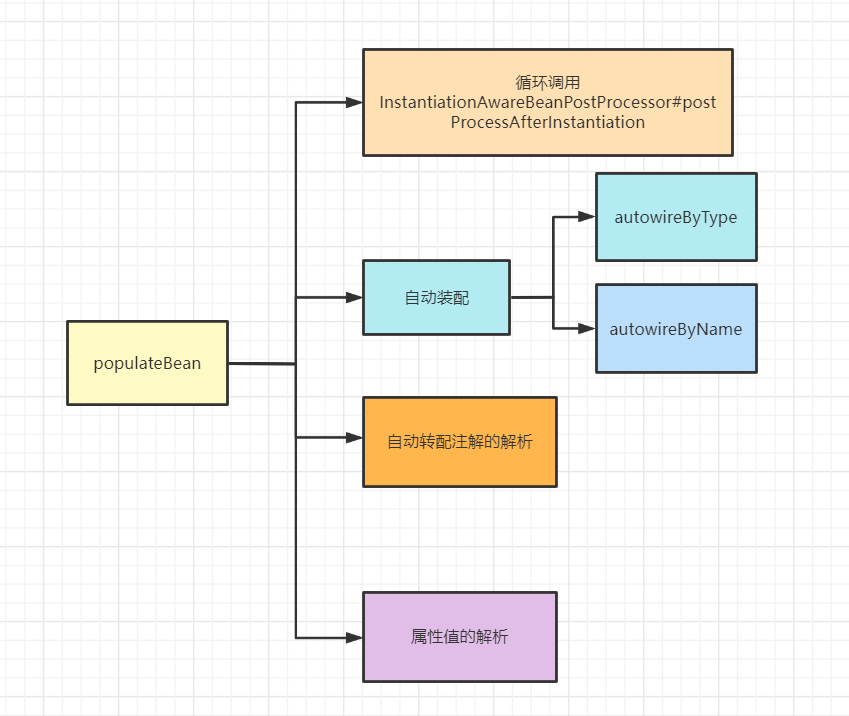
- 使用
InstantiationAwareBeanPostProcessor#postProcessAfterInstantiation接口的调用,可以在属性填充前对Bean进行修改,并且可以定制字段的填充,postProcessAfterInstantiation入参有Bean对象和Bean的名称,可以在这里面进行自定义的属性注入,如果返回false表示后续不需要spring帮我们进行依赖注入,反之需要spring帮我们进行依赖注入
- 按照注入方式进行属性的填充,最终会将解析到的属性和引用放入
PropertyValues中
- 按
autowireByType自动装配
- 按
autowireByName自动装配
- 如果存在
InstantiationAwareBeanPostProcessor接口(CommonAnnotationBeanPostProcessor和AtowiredAnnotationBeanPostProcessor),那么循环去调用postProcessProperties这个方法进行注解的注入,这里调用的实际上就是前面进行Bean的合并时解析的注解,比如:@Autowired、@Resource、@Value等
- 属性值的处理和解析
- 创建一个
BeanDefinitionValueResolver 值解析器
- 循环去遍历解析属性值,解析过程中会用到类型转换的转换服务
ConversionService、SPEL表达式的解析、属性编辑器PropertyEditor
- 最终解析完,会调用到属性的
set方法进行写入
在填充的过程中,发现需要的Bean不存在,那么又会进行getBean、doGetBean、createBean、doCreateBean的调用,然后递归的入栈出栈调用,最终完成属性的填充。
@Resouce @Autowried的异同
相同
- 都可以标注在方法上和字段上
- 都可以使用@Qualifier 限定候选者
- 都可以进行依赖注入
- 都是通过
MergedBeanDefinitionPostProcessor和InstantiationAwareBeanPostProcessor的回调实现依赖注入的
- 底层原理都是反射,反射设置字段的值,反射调用方法
- 二者都是在实例化bean之后,调用
MergedBeanDefinitionPostProcessor#postProcessMergedBeanDefinition方法扫描需要注入的字段 和 方法 放入到缓存中
- 依赖注入都是发生在
InstantiationAwareBeanPostProcessor#postProcessPropertyValues的方法中
- 依赖注入存在多个符合条件的bean都是通过@Primary 的bean胜出(实际上调用
BeanDefinition中的isPrimary()),如果都isPrimary 不能决出胜负则比较优先级,如果还是存在多个那么抛出异常
- 二者都在找不到合适的bean的时候抛出异常
不同
@Resouce 是基于CommonAnnotationBeanPostProcessor 实现的
@Autowried 是基于AutowiredAnnotationBeanPostProcessor 实现的
@Resouce注解默认是根据bean的名称去注入,如果没有指定name,会将字段的名称作为bean的名称,set方法会去掉set前缀且第一个字母小写作为bean的名称,非set方法 方法名称就是bean的名称,如果指定了name 就以name中的内容作为bean的名称
如果没有指定name,使用默认的name,且默认的name在容器中存在,那么调用resolveByBeanName获取bean,要求类型必须兼容字段声明类型or方法入参类型
如果没有指定name且name不存在容器中,会根据类型注入
@Autowried 默认根据类型注入,比如Service存在实现类A和B,字段or方法声明类型为AService但是字段or参数名称为b,还是会根据类型找到符合的bean名称找到a,而不会因为名称是b选择B注入,如果字段or方法参数类型是Service,但是字段or参数名称为a,且没有标注@Qualifier 那么会找到a和b作为候选者,但是后面比较Primary,再比较javax.annotation.Priority注解,然后再根据字段的名称or参数的名称去筛选
@Autowried 标注在方法上支持 0个参数 和任意多个参数 但是@Resouce 要求必须有一个参数
bean的初始化
1
| exposedObject = initializeBean(beanName, exposedObject, mbd);
|
1
2
3
4
5
6
7
8
9
10
11
12
13
14
15
16
17
18
19
20
21
22
23
24
25
26
27
28
29
30
31
32
33
34
| protected Object initializeBean(String beanName, Object bean, @Nullable RootBeanDefinition mbd) {
if (System.getSecurityManager() != null) {
AccessController.doPrivileged((PrivilegedAction<Object>) () -> {
invokeAwareMethods(beanName, bean);
return null;
}, getAccessControlContext());
}
else {
invokeAwareMethods(beanName, bean);
}
Object wrappedBean = bean;
if (mbd == null || !mbd.isSynthetic()) {
wrappedBean = applyBeanPostProcessorsBeforeInitialization(wrappedBean, beanName);
}
try {
invokeInitMethods(beanName, wrappedBean, mbd);
}
catch (Throwable ex) {
throw new BeanCreationException(
(mbd != null ? mbd.getResourceDescription() : null),
beanName, "Invocation of init method failed", ex);
}
if (mbd == null || !mbd.isSynthetic()) {
wrappedBean = applyBeanPostProcessorsAfterInitialization(wrappedBean, beanName);
}
return wrappedBean;
}
|
源码逻辑也很简单,大概就分成了4步:
- 执行
Aware接口的方法invokeAwareMethods
- 执行
BeanPostProcessor#postProcessBeforeInitialization
- 执行初始化方法
- 执行
BeanPostProcessor#postProcessAfterInitialization
执行invokeAwareMethods
1
2
3
4
5
6
7
8
9
10
11
12
13
14
15
16
17
18
19
| private void invokeAwareMethods(String beanName, Object bean) {
if (bean instanceof Aware) {
if (bean instanceof BeanNameAware) {
((BeanNameAware) bean).setBeanName(beanName);
}
if (bean instanceof BeanClassLoaderAware) {
ClassLoader bcl = getBeanClassLoader();
if (bcl != null) {
((BeanClassLoaderAware) bean).setBeanClassLoader(bcl);
}
}
if (bean instanceof BeanFactoryAware) {
((BeanFactoryAware) bean).setBeanFactory(AbstractAutowireCapableBeanFactory.this);
}
}
}
|
这里只执行了3个接口的方法,BeanNameAware,BeanClassLoaderAwre,BeanFactoryAware,在Spring容器中不止这些Aware接口,这里为什么只执行了三个Aware接口?
在Spring容器BeanFactory构造时,对这三个接口进行了忽略:
1
2
3
4
5
6
| public AbstractAutowireCapableBeanFactory() {
super();
ignoreDependencyInterface(BeanNameAware.class);
ignoreDependencyInterface(BeanFactoryAware.class);
ignoreDependencyInterface(BeanClassLoaderAware.class);
}
|
执行BPP的Before方法
循环的执行了BPP的before接口,这里在执行的时候,实现上也执行了在Bean进行merge的时候解析的@PostConstruct注解。
1
2
3
4
5
6
7
8
9
10
11
12
13
14
15
16
17
18
19
20
21
22
23
24
25
26
27
28
29
30
31
| @Override
public Object applyBeanPostProcessorsBeforeInitialization(Object existingBean, String beanName)
throws BeansException {
Object result = existingBean;
for (BeanPostProcessor processor : getBeanPostProcessors()) {
Object current = processor.postProcessBeforeInitialization(result, beanName);
if (current == null) {
return result;
}
result = current;
}
return result;
}
public Object postProcessBeforeInitialization(Object bean, String beanName) throws BeansException {
LifecycleMetadata metadata = findLifecycleMetadata(bean.getClass());
try {
metadata.invokeInitMethods(bean, beanName);
}
catch (InvocationTargetException ex) {
throw new BeanCreationException(beanName, "Invocation of init method failed", ex.getTargetException());
}
catch (Throwable ex) {
throw new BeanCreationException(beanName, "Failed to invoke init method", ex);
}
return bean;
}
|
我们在开始的准备BeanFactory的时候又进行了忽略Aware接口:
1
2
3
4
5
6
| beanFactory.ignoreDependencyInterface(EnvironmentAware.class);
beanFactory.ignoreDependencyInterface(EmbeddedValueResolverAware.class);
beanFactory.ignoreDependencyInterface(ResourceLoaderAware.class);
beanFactory.ignoreDependencyInterface(ApplicationEventPublisherAware.class);
beanFactory.ignoreDependencyInterface(MessageSourceAware.class);
beanFactory.ignoreDependencyInterface(ApplicationContextAware.class);
|
这6个接口在哪里执行的呢?在BeanFactory准备阶段注册了一个BeanPostProcessor的实现叫ApplicationContextAwareProcessor类,这个类负责回调一些Aware接口(和BeanFactory无关的Aware),这个类的before方法中就进行了调用:
1
2
3
4
5
6
7
8
9
10
11
12
13
14
15
16
17
18
19
20
21
22
23
24
25
26
27
28
29
30
31
32
33
34
35
36
37
38
39
40
41
42
43
44
45
| public Object postProcessBeforeInitialization(Object bean, String beanName) throws BeansException {
if (!(bean instanceof EnvironmentAware || bean instanceof EmbeddedValueResolverAware ||
bean instanceof ResourceLoaderAware || bean instanceof ApplicationEventPublisherAware ||
bean instanceof MessageSourceAware || bean instanceof ApplicationContextAware)){
return bean;
}
AccessControlContext acc = null;
if (System.getSecurityManager() != null) {
acc = this.applicationContext.getBeanFactory().getAccessControlContext();
}
if (acc != null) {
AccessController.doPrivileged((PrivilegedAction<Object>) () -> {
invokeAwareInterfaces(bean);
return null;
}, acc);
}
else {
invokeAwareInterfaces(bean);
}
return bean;
}
private void invokeAwareInterfaces(Object bean) {
if (bean instanceof EnvironmentAware) {
((EnvironmentAware) bean).setEnvironment(this.applicationContext.getEnvironment());
}
if (bean instanceof EmbeddedValueResolverAware) {
((EmbeddedValueResolverAware) bean).setEmbeddedValueResolver(this.embeddedValueResolver);
}
if (bean instanceof ResourceLoaderAware) {
((ResourceLoaderAware) bean).setResourceLoader(this.applicationContext);
}
if (bean instanceof ApplicationEventPublisherAware) {
((ApplicationEventPublisherAware) bean).setApplicationEventPublisher(this.applicationContext);
}
if (bean instanceof MessageSourceAware) {
((MessageSourceAware) bean).setMessageSource(this.applicationContext);
}
if (bean instanceof ApplicationContextAware) {
((ApplicationContextAware) bean).setApplicationContext(this.applicationContext);
}
}
|
个人认为主要是做了个区分而已,前面三个接口输入BeanFactory范畴,而这6个接口属于ApplicationContext范畴,只是进行了归类处理而已。
执行初始化方法
执行初始化方法的时候,会分为两步,一个是执行InitializingBean 的afterPropertiesSet方法,另一个是执行自定义的init-method方法。
1
2
3
4
5
6
7
8
9
10
11
12
13
14
15
16
17
18
19
20
21
22
23
24
25
26
27
28
29
30
31
32
33
34
35
36
| protected void invokeInitMethods(String beanName, final Object bean, RootBeanDefinition mbd)
throws Throwable {
boolean isInitializingBean = (bean instanceof InitializingBean);
if (isInitializingBean && (mbd == null || !mbd.isExternallyManagedInitMethod("afterPropertiesSet"))) {
...
if (System.getSecurityManager() != null) {
try {
AccessController.doPrivileged(new PrivilegedExceptionAction<Object>() {
@Override
public Object run() throws Exception {
((InitializingBean) bean).afterPropertiesSet();
return null;
}
}, getAccessControlContext());
}
catch (PrivilegedActionException pae) {
throw pae.getException();
}
}
else {
((InitializingBean) bean).afterPropertiesSet();
}
}
if (mbd != null) {
String initMethodName = mbd.getInitMethodName();
if (initMethodName != null && !(isInitializingBean && "afterPropertiesSet".equals(initMethodName)) &&
!mbd.isExternallyManagedInitMethod(initMethodName)) {
invokeCustomInitMethod(beanName, bean, mbd);
}
}
}
|
执行BPP的after接口
BPP的after主要是用来实现AOP的,所以这里简单介绍下,循环执行after方法的调用。
1
2
3
4
5
6
7
8
9
10
11
12
13
| @Override
public Object applyBeanPostProcessorsAfterInitialization(Object existingBean, String beanName)
throws BeansException {
Object result = existingBean;
for (BeanPostProcessor beanProcessor : getBeanPostProcessors()) {
result = beanProcessor.postProcessAfterInitialization(result, beanName);
if (result == null) {
return result;
}
}
return result;
}
|
初始化就解读完了,Spring的Bean的创建也基本讲完,最终创建出来的Bean对象就会放入到一级缓存singletonObjects中。