一、SpringSecurity框架简介
1.1 概要
的关于安全方面的两个主要区域是“认证”和“授权”(或者访问控制),一般来说,Web 应用的安全性包括用户认证(Authentication)和用户授权(Authorization)两个部分,这两点也是 Spring Security 重要核心功能。
(1)用户认证指的是:验证某个用户是否为系统中的合法主体,也就是说用户能否访问该系统。用户认证一般要求用户提供用户名和密码(现在有二维码、手机短信、指纹认证)。系统通过校验用户名和密码来完成认证过程。通俗点说就是系统认为用户是否能登录
(2)用户授权指的是验证某个用户是否有权限执行某个操作。在一个系统中,不同用户所具有的权限是不同的。比如对一个文件来说,有的用户只能进行读取,而有的用户可以进行修改。一般来说,系统会为不同的用户分配不同的角色,而每个角色则对应一系列的权限。通俗点讲就是系统判断用户是否有权限去做某些事情。
1.2 会话
用户认证通过后,为了避免用户的每次操作都进行认证可将用户的信息保证在会话中。会话就是系统为了保持当前用户的登录状态所提供的机制,常见的有基于session方式、基于token方式等。
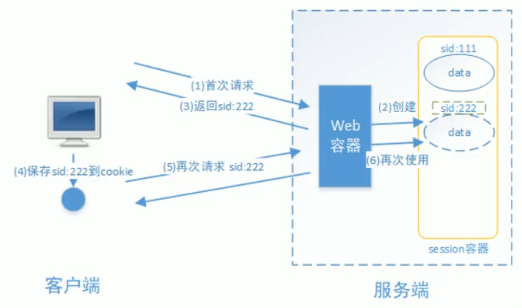
1.2.1 基于session的认证方式
用户认证成功后,在服务端生成用户相关的数据保存在session(当前会话)中,发给客户端的 sesssion_id 存放到 cookie 中,这样用户客户端请求时带上 session_id 就可以验证服务器端是否存在 session 数据,以此完成用户的合法校验,当用户退出系统或session过期销毁时,客户端的session_id也就无效了。
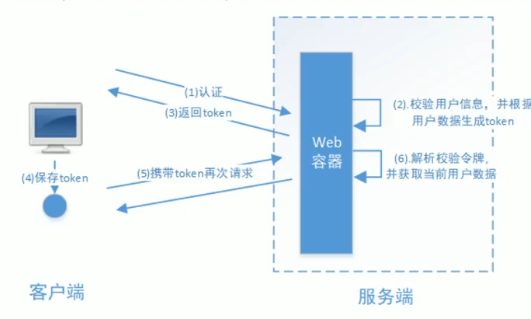
1.2.2 基于token的认证方式
用户认证成功后,服务端生成一个token发给客户端,客户端可以放到 cookie 或 localStorage 等存储中,每次请求时带上 token,服务端收到token通过验证后即可确认用户身份。
基于session的认证方式由Servlet规范定制,服务端要存储session信息需要占用内存资源,客户端需要支持 cookie;基于token的方式则一般不需要服务端存储token,并且不限制客户端的存储方式。如今移动互联网时代更多类型的客户端需要接入系统,系统多是采用前后端分离的架构进行实现,所以基于token的方式更适合。
1.3 同款产品对比
1.3.1 Spring Security
Spring 技术栈的组成部分。
SpringSecurity 特点:
和 Spring 无缝整合。
全面的权限控制。
专门为 Web 开发而设计。
- 旧版本不能脱离 Web 环境使用。
- 新版本对整个框架进行了分层抽取,分成了核心模块和 Web 模块。单独引入核心模块就可以脱离 Web 环境。
重量级。
1.3.2 Shiro
Apache 旗下的轻量级权限控制框架。
特点:
Spring Security 是 Spring 家族中的一个安全管理框架,实际上,在 Spring Boot 出现之前,Spring Security 就已经发展了多年了,但是使用的并不多,安全管理这个领域,一直是 Shiro 的天下。
相对于 Shiro,在 SSM 中整合 Spring Security 都是比较麻烦的操作,所以,Spring Security 虽然功能比 Shiro 强大,但是使用反而没有 Shiro 多(Shiro 虽然功能没有Spring Security 多,但是对于大部分项目而言,Shiro 也够用了)。
自从有了 Spring Boot 之后,Spring Boot 对于 Spring Security 提供了自动化配置方案,可以使用更少的配置来使用 Spring Security。
因此,一般来说,常见的安全管理技术栈的组合是这样的:
以上只是一个推荐的组合而已,如果单纯从技术上来说,无论怎么组合,都是可以运行的。
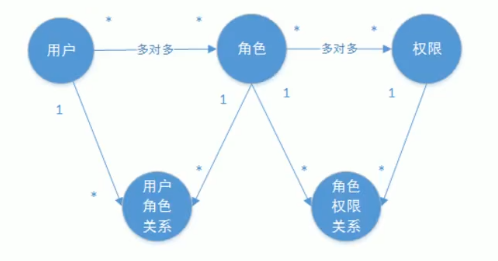
1.4 授权的数据模型
授权可简单理解为Who对What(which)进行How操作
- who:即主体(Subject),主体一般是指用户,也可以是程序,需要访问系统中的资源。
- What:即资源 (Resource),如系统菜单、页面、按钮、代码方法、系统商品信息、系统订单信息等。系统菜单、页面、按钮、代码方法都属于系统功能资源,对于web系统每个功能资源通常对应一个URL;系统商品信息、系统订单信息 都属于实体资源(数据资源),实体资源由资源类型和资源实例组成,比如商品信息为资源类型,商品编号为001的商品为资源实例。
- How,权限/许可(Permission),规定了用户对资源的操作许可,权限离开资源没有意义, 如用户查询权限、用户添加权限、某个代码方法的调用权限、编号为001的用户的修改权限等,通过权限可知用户 对哪些资源都有哪些操作许可。
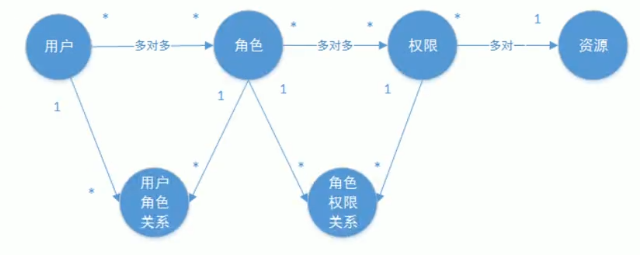
通常企业开发中将资源和权限表合并为一张权限表
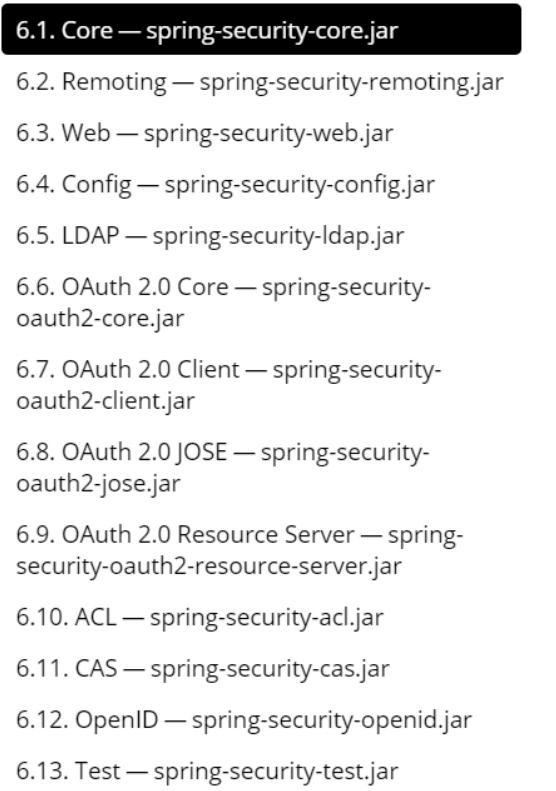
1.5 模块划分
二、SpringSecurity 入门案例
2.1 创建一个项目
引入springSecurity依赖
1
2
3
4
5
6
7
8
9
10
| <parent>
<groupId>org.springframework.boot</groupId>
<artifactId>spring-boot-starter-parent</artifactId>
<version>2.2.1.RELEASE</version>
<relativePath/> </parent>
<dependency>
<groupld> org.springframework.boot</groupld>
<artifactId>spring-boot-starter-security</artifactId>
</dependency>
|
写一个controller
1
2
3
4
5
6
7
8
| @RestController
@RequestMapping("/test")
public class TestController {
@GetMapping("hello")
public String hello(){
return "hello security";
}
}
|
默认用户名:user,密码通过控制台找到
2.2 SpringSecurity 基本原理
SpringSecurity 本质是一个过滤器链:
从启动是可以获取到过滤器链:
1
2
3
4
5
6
7
8
9
10
11
12
13
14
15
| org.springframework.security.web.context.request.async.WebAsyncManagerIntegrationFil
ter
org.springframework.security.web.context.SecurityContextPersistenceFilter
org.springframework.security.web.header.HeaderWriterFilter
org.springframework.security.web.csrf.CsrfFilter
org.springframework.security.web.authentication.logout.LogoutFilter
org.springframework.security.web.authentication.UsernamePasswordAuthenticationFilter
org.springframework.security.web.authentication.ui.DefaultLoginPageGeneratingFilter
org.springframework.security.web.authentication.ui.DefaultLogoutPageGeneratingFilter
org.springframework.security.web.savedrequest.RequestCacheAwareFilter
org.springframework.security.web.servletapi.SecurityContextHolderAwareRequestFilter
org.springframework.security.web.authentication.AnonymousAuthenticationFilter
org.springframework.security.web.session.SessionManagementFilter
org.springframework.security.web.access.ExceptionTranslationFilter
org.springframework.security.web.access.intercept.FilterSecurityInterceptor
|
代码底层流程:重点看三个过滤器:
FilterSecurityInterceptor:是一个方法级的权限过滤器, 基本位于过滤链的最底部。
在invoke方法中
super.beforeInvocation(fi) 表示查看之前的 filter 是否通过。
fi.getChain().doFilter(fi.getRequest(), fi.getResponse());表示真正的调用后台的服务。
ExceptionTranslationFilter:是个异常过滤器,用来处理在认证授权过程中抛出的异常
UsernamePasswordAuthenticationFilter :对/login 的 POST 请求做拦截,校验表单中用户
名,密码。
过滤器如何进行加载?
1.使用SpringSecurity配置过滤器DelegatingFilterProxy
dofilter->initDelegate->FilterChainProxy加载所有过滤器
2.3 UserDetailsService接口讲解
当什么也没有配置的时候,账号和密码是由 Spring Security 定义生成的。而在实际项目中账号和密码都是从数据库中查询出来的。 所以我们要通过自定义逻辑控制认证逻辑。如果需要自定义逻辑时,只需要实现 UserDetailsService 接口即可。
返回值 UserDetails
这个类是系统默认的用户“主体”// 表示获取登录用户所有权限
1
2
3
4
5
6
7
8
9
10
11
12
13
14
15
16
17
18
19
| Collection<? **extends** GrantedAuthority> getAuthorities();
String getPassword();
String getUsername();
boolean isAccountNonExpired();
boolean isAccountNonLocked();
boolean isCredentialsNonExpired();
boolean isEnabled();
|
创建类继承UsernamePasswordAuthenticationFilter,重写三个方法创建类实现UscrDetailScrvicc,编写查询数据过程,返回User对象,这个User对象是安全框架提供对象
2.4 PasswordEncoder 接口讲解
1
2
3
4
5
6
7
8
9
10
|
String encode(CharSequence rawPassword);
配,则返回 true;如果不匹配,则返回 false。第一个参数表示需要被解析的密码。第二个
参数表示存储的密码。
boolean matches(CharSequence rawPassword, String encodedPassword);
false。默认返回 false。
default boolean upgradeEncoding(String encodedPassword) {
return false; }
|
三、SpringSecurity Web 权限方案
3.1 设置登录系统的账号、密码
方式一:在 application.properties
1
2
| spring.security.user.name=admin
spring.security.user.password=123
|
方式二:编写类实现接口
第一步:创建配置类,设置使用哪个userDetailService实现类
第二步:编写实现类,返回User对象,User对象有用户名密码和操作权限
1
2
3
4
5
6
7
8
9
10
11
12
13
14
15
16
17
18
19
| @Configuration
public class SecurityConfig {
@Autowired
private UserDetailsService userDetailsService;
@Override
protected void configure(AuthenticationManagerBuilder auth) throws Exception {
auth.userDetailsService(userDetailsService)
.passwordEncoder(passwordEncoder());
)
@Bean
public PasswordEncoder passwordEncoder(){
return new BCryptPasswordEncoder();
}
}
|
1
2
3
4
5
6
7
8
9
10
11
12
13
14
15
16
| @Service("userDetailsService")
public class LoginService implements UserDetailsService {
@Override
public UserDetails loadUserByUsername(String username) throws UsernameNotFoundException {
if (!"admin".equals(username)){
throw new UsernameNotFoundException("用户名不存在!");
}
String pwd =
"$2a$10$2R/M6iU3mCZt3ByG7kwYTeeW0w7/UqdeXrb27zkBIizBvAven0/na";
return new User(username,pwd,
AuthorityUtils.commaSeparatedStringToAuthorityList("admin,"));
}
}
|
3.2 实现数据库认证来完成用户登录
3.2.1 准备 sql
1
2
3
4
5
6
7
8
9
10
11
12
13
14
15
16
17
18
19
20
21
22
23
24
25
26
27
28
29
30
31
32
33
34
35
36
37
38
39
40
41
42
43
| create table users(
id bigint primary key auto_increment,
username varchar(20) unique not null,
password varchar(100)
);
insert into users values(1,'张
san','$2a$10$2R/M6iU3mCZt3ByG7kwYTeeW0w7/UqdeXrb27zkBIizBvAven0/na');
insert into users values(2,'李
si','$2a$10$2R/M6iU3mCZt3ByG7kwYTeeW0w7/UqdeXrb27zkBIizBvAven0/na');
create table role(
id bigint primary key auto_increment,
name varchar(20)
);
insert into role values(1,'管理员');
insert into role values(2,'普通用户');
create table role_user(
uid bigint,
rid bigint
);
insert into role_user values(1,1);
insert into role_user values(2,2);
create table menu(
id bigint primary key auto_increment,
name varchar(20),
url varchar(100),
parentid bigint,
permission varchar(20)
);
insert into menu values(1,'系统管理','',0,'menu:system');
insert into menu values(2,'用户管理','',0,'menu:user');
create table role_menu(
mid bigint,
rid bigint
);
insert into role_menu values(1,1);
insert into role_menu values(2,1);
insert into role_menu values(2,2);
|
3.2.2 添加依赖
1
2
3
4
5
6
7
8
9
10
11
12
13
14
15
16
17
18
19
20
21
22
23
24
25
26
27
28
29
30
31
| <dependencies>
<dependency>
<groupId>org.springframework.boot</groupId>
<artifactId>spring-boot-starter-web</artifactId>
</dependency>
<dependency>
<groupId>org.springframework.boot</groupId>
<artifactId>spring-boot-starter-security</artifactId>
</dependency>
<dependency>
<groupId>org.springframework.boot</groupId>
<artifactId>spring-boot-starter-test</artifactId>
<scope>test</scope>
</dependency>
<dependency>
<groupId>com.baomidou</groupId>
<artifactId>mybatis-plus-boot-starter</artifactId>
<version>3.0.5</version>
</dependency>
<dependency>
<groupId>mysql</groupId>
<artifactId>mysql-connector-java</artifactId>
</dependency>
<dependency>
<groupId>org.projectlombok</groupId>
<artifactId>lombok</artifactId>
</dependency>
</dependencies>
|
3.2.3 制作实体类
1
2
3
4
5
6
| @Data
public class Users {
private Integer id;
private String username;
private String password;
}
|
3.2.4 整合 MybatisPlus 制作 mapper
1
2
3
| @Repository
interface UsersMapper extends BaseMapper<Users> {
}
|
1
2
3
4
5
6
| 配置文件添加数据库配置
spring.datasource.driver-class-name=com.mysql.cj.jdbc.Driver
spring.datasource.url=jdbc:mysql://localhost:3306/demo?serverTimezone=GMT%2B8
spring.datasource.username=root
spring.datasource.password=root
|
3.2.5 制作登录实现类
1
2
3
4
5
6
7
8
9
10
11
12
13
14
15
16
17
| @Service("userDetailsService")
public class MyUserDetailsService implements UserDetailsService {
@Autowired
private UsersMapper usersMapper;
@Override
public UserDetails loadUserByUsername(String s) throws UsernameNotFoundException{
QueryWrapper<Users> wrapper = new QueryWrapper();
wrapper.eq("username",s);
Users users = usersMapper.selectOne(wrapper);
if(users == null) {
throw new UsernameNotFoundException("用户名不存在!");
}
System.out.println(users);
List<GrantedAuthority> auths = AuthorityUtils.commaSeparatedStringToAuthorityList("role");
return new User(users.getUsername(),new BCryptPasswordEncoder().encode(users.getPassword()),auths);
}
}
|
3.2.6 启动类添加
1
2
3
4
5
6
7
| @SpringBootApplication
@MapperScan("com.lq.security.springboot.mapper")
public class SecuritySpringbootApp {
public static void main(String[] args) {
SpringApplication.run(SecuritySpringbootApp.class, args);
}
}
|
3.3 未认证请求跳转到登录页
3.3.1 引入前端模板依赖
1
2
3
4
| <dependency>
<groupId>org.springframework.boot</groupId>
<artifactId>spring-boot-starter-thymeleaf</artifactId>
</dependency>
|
3.3.2 引入登录页面
将准备好的登录页面导入项目中
3.3.3 编写控制器
1
2
3
4
5
6
7
8
9
10
11
12
| @Controller
public class IndexController {
@GetMapping("index")
public String index(){
return "login";
}
@GetMapping("findAll")
@ResponseBody
public String findAll(){
return "findAll";
}
}
|
3.3.4 编写配置类放行登录页面以及静态资源
1
2
3
4
5
6
7
8
9
10
11
12
13
14
15
16
| @Configuration
public class SecurityConfig extends WebSecurityConfigurerAdapter {
@Bean
public PasswordEncoder passwordEncoder(){
return new BCryptPasswordEncoder();
}
@Override
protected void configure(HttpSecurity http) throws Exception {
http.authorizeRequests()
.antMatchers("/layui/**","/index")
.permitAll()
.anyRequest()
.authenticated();
}
}
|
3.4 基于角色或权限进行访问控制
3.4.1 hasAuthority 方法
如果当前的主体具有指定的权限,则返回 true,否则返回 false
1
2
3
4
5
6
7
8
9
10
11
12
13
14
15
16
17
| @Configuration
public class SecurityConfig extends WebSecurityConfigurerAdapter {
@Bean
public PasswordEncoder passwordEncoder(){
return new BCryptPasswordEncoder();
}
@Override
protected void configure(HttpSecurity http) throws Exception {
http.authorizeRequests()
.antMatchers("/layui/**","/index")
.antMatchers("/test/index").hasAuthority("admins")
.permitAll()
.anyRequest()
.authenticated();
}
}
|
在userDetailService中添加权限
3.4.2 hasAnyAuthority 方法
如果当前的主体有任何提供的角色(给定的作为一个逗号分隔的字符串列表)的话,返回true.
3.4.3 hasRole 方法
如果用户具备给定角色就允许访问,否则出现 403。
如果当前主体具有指定的角色,则返回 true。
.antMatchers(“/test/index”).hasRole(“sale”) //当前登陆用户有这个admins权限才能访问
修改配置文件:
注意配置文件中不需要添加”ROLE_“,因为上述的底层代码会自动添加与之进行匹配。
3.4.4 hasAnyRole
表示用户具备任何一个条件都可以访问。
3.6 自定义 403 页面
3.6.1 修改访问配置类
http.exceptionHandling().accessDeniedPage(**"/unauth"**);
1
2
3
4
5
6
7
8
| @GetMapping("/unauth")
public String accessDenyPage(){
return "unauth";
}
unauth.html
<body>
<h1>对不起,您没有访问权限!</h1>
</body>
|
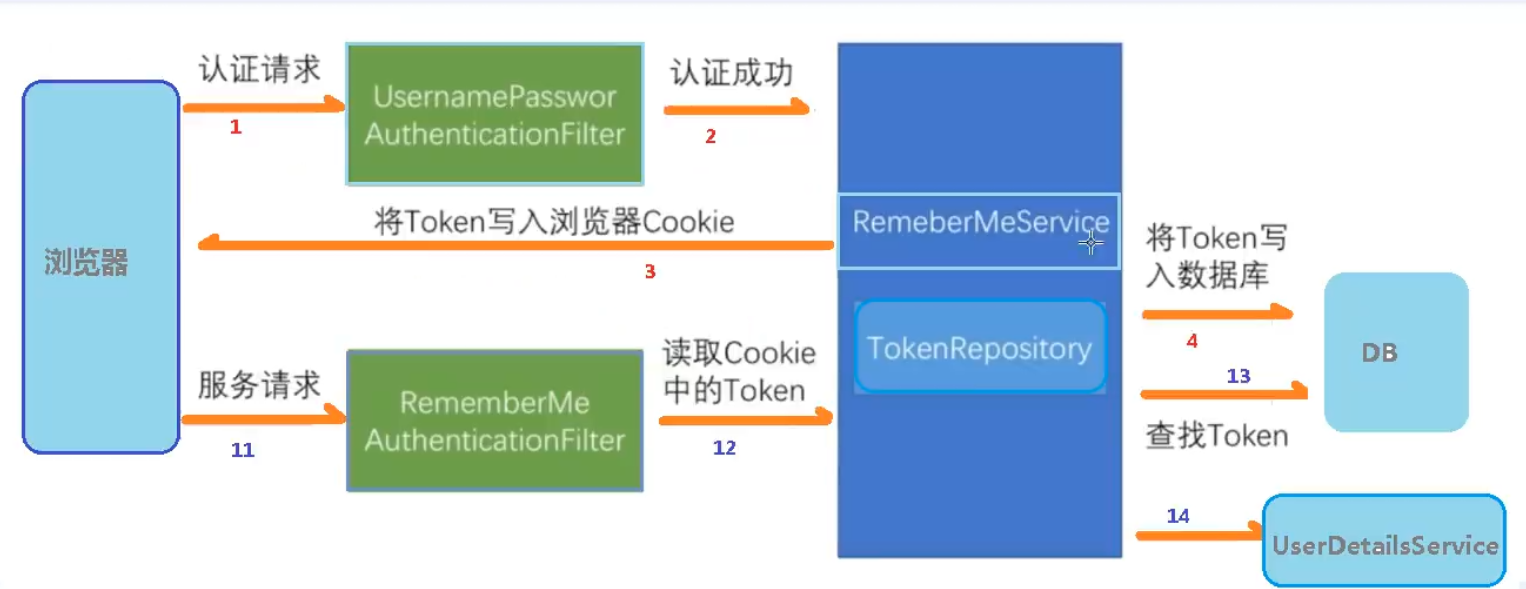
3.8 基于数据库的记住我
3.9 用户注销
3.9.1 在登录页面添加一个退出连接
success.html
1
2
3
| <body>
登录成功<br> <a href="/logout">退出</a>
</body>
|
3.9.2 在配置类中添加退出映射地址
http.logout().logoutUrl(“/logout”).logoutSuccessUrl(“/index”).permitAll
四、csrf
4.1 CSRF 理解
跨站请求伪造(英语:Cross-site request forgery),也被称为 one-click attack 或者 session riding,通常缩写为 CSRF 或者 XSRF, 是一种挟制用户在当前已登录的 Web 应用程序上执行非本意的操作的攻击方法。
- XSS利用的是用户对指定网站的信任
- CSRF 利用的是网站对用户网页浏览器的信任。
跨站请求攻击,简单地说,是攻击者通过一些技术手段欺骗用户的浏览器去访问一个自己曾经认证过的网站并运行一些操作(如发邮件,发消息,甚至财产操作如转账和购买商品)。由于浏览器曾经认证过,所以被访问的网站会认为是真正的用户操作而去运行。
这利用了 web 中用户身份验证的一个漏洞:简单的身份验证只能保证请求发自某个用户的浏览器,却不能保证请求本身是用户自愿发出的。
Spring Security CSRF 会针对 PATCH,POST,PUT 和 DELETE 方法进行防护。
4.2 Spring Security 实现 CSRF 的原理
- 生成 csrfToken 保存到 HttpSession 或者 Cookie 中。
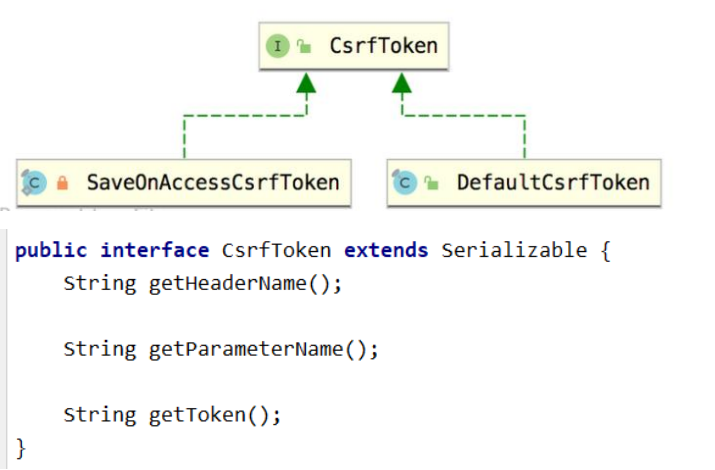
SaveOnAccessCsrfToken 类有个接口 CsrfTokenRepository
- 请求到来时,从请求中提取 csrfToken,和保存的 csrfToken 做比较,进而判断当前请求是否合法。主要通过 CsrfFilter 过滤器来完成。